Introduction and CostsThe Lead Management module provides an ideal environment for working on data outside of the main Gold-Vision system.
|
Lead SourcesWhether your leads come from a list you have bought, an exhibition you have attended or from your web site they can all be imported into Gold-Vision
|
Working on LeadsViewing, using and promoting Leads from within the Lead Management Module.
|
AlertingCreate alerts to let your team know when a lead has been assigned or has visited your website
|
Lead Scoring
|
Lead Nurture and CampaignsWhat do you do with a Lead that is relevant to your business, but not ready to buy? Pop it into a nurture cycle.
|
Reporting
|
Scenarios
|
Gold- Vision’s optional Lead Management module is the ideal environment to capture and streamline your leads. Work on your marketing lists without compromising your clean customer data.
Flexible Sources
Collect your leads however you prefer, from trade shows to inbound B2B website leads and outbound purchased lists, and import the data into Lead Management. Filter the list data to allow sales people to focus on the leads that are most likely to convert.
Use full marketing functionality, allowing you to create anything from one-off marketing campaigns right through to fully automated nurture campaigns.
Score your Leads
Combine Touch Points with Lead Management to create a marketing lead scoring system resulting in fully qualified leads.
Automatically score based on interactions with your website and marketing campaigns.
Keep your data clean
Lead lists from different sources may not contain accurate information. The Lead Management module creates the ideal environment to work on your data outside of the clean account records.
Powerful de-duplication runs against the core CRM providing an extra level of control.
Track & Report
View lead progress using Gold-Vision dashboards.
Improve lead measurement and determine which lead sources are creating the best ROI.
Promote Leads when they are ready
Because the Lead Management module is fully integrated in Gold-Vision, you can promote qualified leads into CRM with one click, and the entire lead history moves with it.
Generate new Sales
By capturing your leads and prospects early, Lead Management allows you to generate new business quickly and efficiently.
Licensing
Access to Lead Management can be switched on by users from the Gold-Vision Administration console.
Existing customers may need a new licence key for the activation of the Lead Management users; please check the Licensing area in the Administration Console.
Cost
Additional users for the Lead Management module are provided on a subscription cost basis as follows:
- £10 per month or £120 per annum for each user inclusive of support, maintenance & upgrades.
- or an additional £5 per user for an existing monthly Subscription Licence (including Hosted)
Lead Management can be added for either a Gold-Vision or Gold-Tracker based on the above costs which are exclusive of VAT.
Discounts can apply based on volume usage.
Please check with your Account Manager for further information on any aspect of the Lead Management module.
Your Leads may come from a variety of sources, from trade shows, purchased lists or visits to your website. We can integrate with your web site or you can set up web tracking to automatically create leads in Lead Management. Each source can have its own Lead record designed to capture the information relevant to that particular source.
Imported Lists
Lists can be imported using our Data Import Tool, see your Gold-Vision Administrator or read the Lead Import Guide
Your website
Website integration - contact us to discuss the integration of your web form with Lead Management
Web Tracking
Use Web Tracking integration to generate Leads for previously unknown website visitors. More info
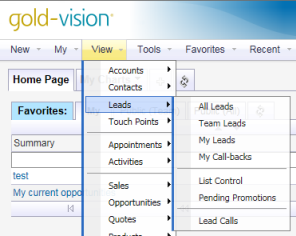
All, Team, My Leads - general Leads view.
Call-backs - view your scheduled call-backs. See below.
List Control - View and manage imported lists
Pending Promotions - Lists any Lead promotions that are pending if the system has been configured where promotions have to be completed by a different user than the record owner.
Leads Calls Calls made from Lead Management via the Call button or icons will log a Lead Management Call record. On promotion, all Lead Calls will be migrated to the respective contact record.
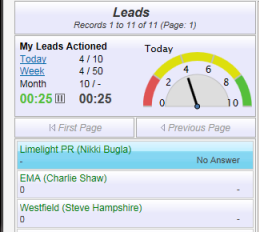
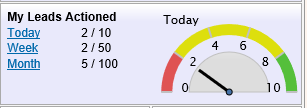
Actioned Lead Performance - A summary of Lead performance in terms of number of Leads 'actioned' by the user against their 'target' as defined under the Admin Console. (Please see Lead management setup guide to see how to set user targets). Actioned Leads are Leads where the outcome has been updated or a note has been added.
Timers- if the Lead belongs to the current user:
Timer on the left is the amount of time spent on this Lead in the current session
Timer on the right is the total time spent on this Lead in total. This can be disabled in the Admin Console.
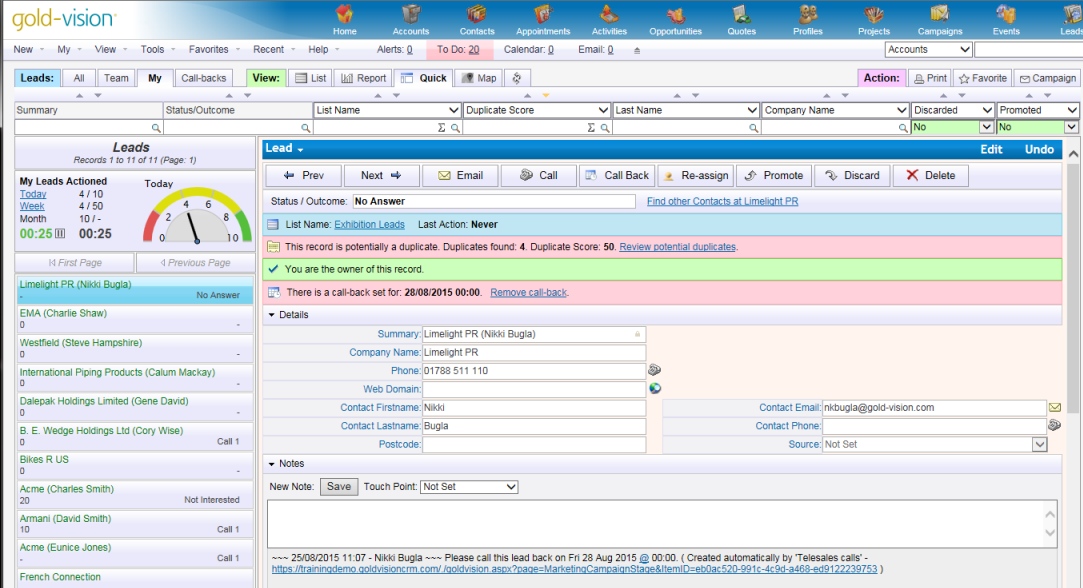
The default view of a lead is the Quick View
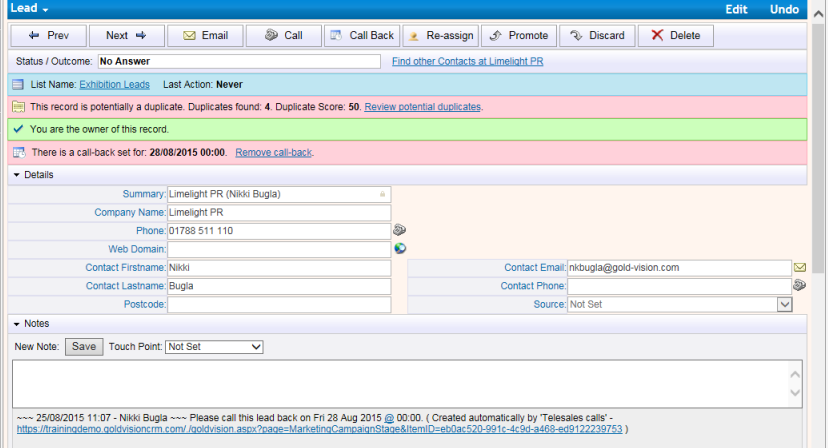
Previous/Next - These allow the user to move forward and backward through individual records.
Email - Click to open a new email to the Lead. If the record does not contain an email address, this will be inactive.
Call - Click to dial the number for the Lead (requires phone system integration - if there is more than one number it will pick a number in the following order -contact phone, main phone, mobile. If all phone number fields are blank the tab will be inactive)
Call Back - Allows the user to save a date and time to call the Lead back. This will make the Lead appear under the 'Call-backs' tab and also on their 'To Do' list
Re-assign - allows the owner of the Lead to re-assign to another user or team
Promote - Displays the promotion control.
Discard- If no linger wish to be the owner of the Lead this action removes ownership of the Lead as well as flags it as "discarded".
Delete - Deletes the record completely.
Status / Outcome. This allows the user to quickly record the current state or stage of the relationship. Options can be selected from a list (configured in the Admin Console) and will save automatically, but may be manually over typed if set up to allow users to do so. Click in the outcome field, over type and select Save Status
Find other Contacts search for any other contacts at this organisation. If any matches are found the following control will be shown, which is similar in function to the duplicates list. This allows the user to quickly see who else might be known or being spoken to at the current organisation by other users.
Claiming Leads Unclaimed Leads can be claimed by clicking this link. A note is added as confirmation that the Lead has been claimed. If Leads are owned by another User, this will be displayed and you will not have access to the above tabs.
Duplicates When Leads are first imported, and as changes are made in the system, Gold-Vision will automatically compare all Lead records for duplicates. Gold-Vision will search all imported Lead lists as well as main Account/Contact records for duplicate matches. If any duplicates are found then a red notification bar will be displayed against the record with a link to review the potential duplicates.
Duplicates are listed and scored based on specific rules eg matching E-mail =50 points
Leads can be promoted into the main Gold-Vision Account and Contact system by using the Promote control. There are two settings for this process -
Option 1 Approval required (by the List Owner) Click Promote on the Lead record. This places the Lead in the Pending Promotions list for the List Owner.
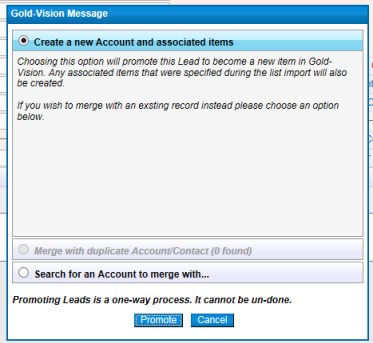
Option 2 Anyone can promote When a user who has access clicks Promote they will be displayed the following options.
Create New Account and Contact - Choosing this option creates a new Account (and Contact) in the main system. If configured this could then create a follow up activity or opportunity in Gold-Vision.
Merge with Duplicate - If potential Gold-Vision duplicates have been found the user may 'merge' their promotion with the existing item.
Search and Merge - This allows the user to manually search for an Account to merge with if one is known to exist.
If Promotion mode is set to Approval Required, only the List Owner will have access to this.
When a lead is promoted and being merged, the user can choose whether or not to overwrite existing data for the Account/Contact
Create alerts to enable users to act swiftly on high quality Leads.
For example:
Alert the user when a Lead has been assigned to them.
Using Marketing Automation alert the user when a lead touch point score has raised over a certain score.
See your Gold-Vision Administrator for help in creating alerts, or why not attend one of our Webinars
Combine Touch Points with Lead Management to create a marketing lead scoring system resulting in fully qualified leads. It’s a great way to work out which of your leads are close to being sales ready.
Web Scoring |
Automatically score leads based on the interest they show in your business. When a Lead clicks on a specific page on your web site they will accumulate Touch Points. Filter the list data and assign high-scoring leads to sales teams. |
Connect |
Create scores based on interactions with your Connect emails, if a Lead click on a link in a Connect email they receive they will get a Touch Point score, you can then monitor their interest in your Company. |
Social |
Create scores based on interactions with your company Facebook or Twitter account, see who interacts with you via social media. |
Manual |
Manually add scores to Leads who show an interest in your products or your company. |
What Next?
Use the scoring system to qualify your leads, add to a Lead Nurture Campaign, re-assign to a Sales Person or promote the Lead in to Gold-Vision.
See Touch Points for more information.
Or using Marketing Automation, alert the Lead owner when a Lead score raises over a nominal score. See Marketing Automation for more info
You now have Leads, but they might not be ready to buy from you, keep them warm by adding them to a Lead Nurture series of emails. Marketing Automation makes this very easy and hassle free! See our web clip for how to set this up.
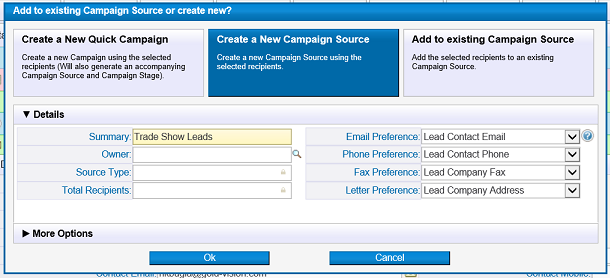
You can create Quick Campaigns and Campaign Sources from a Leads list.
For example you might have a status of 'Keep Warm' for Leads who are not yet ready to purchase. By filtering your Leads by this status and creating a Campaign Source, which can then be used in a Lead Nurture cycle of mailshots.
In the Lead Nurture Cycle, Leads will receive a series of automated emails (via our Marketing Automation add-on). Each time they click a link in your mailshot or visit your website they will accumulate a score (using Touch Points)
Campaigns and Campaign Sources work in the same way as in the main Gold-Vision.
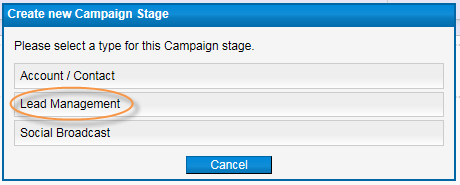
When creating a Campaign Stage, select Lead Management.
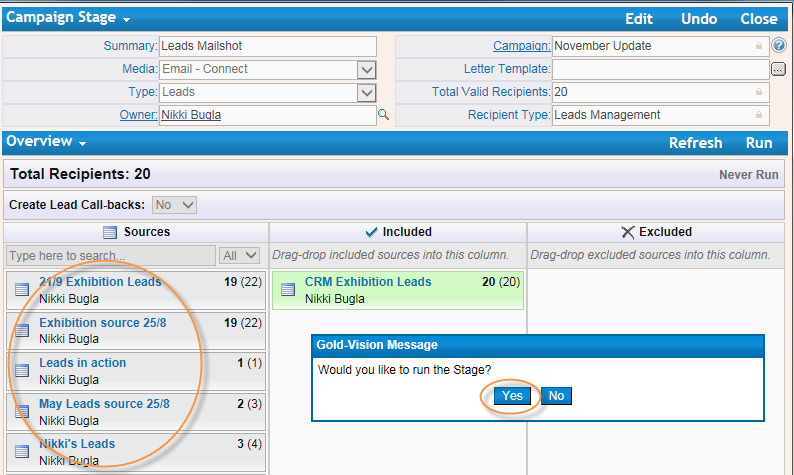
The list of Sources available are sources created from Lead Management.
Please note: lists from Lead Management can not be combined with your Gold-Vision data.
You will then be able to select your Lead Source and run the stage.
See Marketing for full details.
Note - there is an option in the Admin Console (Lead Management Settings) to Invalidate Leads where the email address already exists in Gold-Vision. Leads will show as Invalid For Email with the reason -Lead Potentially In Gold-Vision
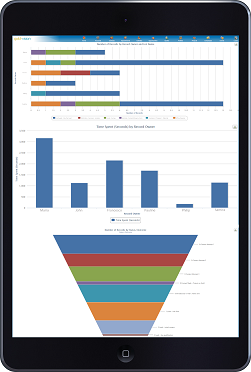
You can create Dashboards and Reports from your Leads lists.
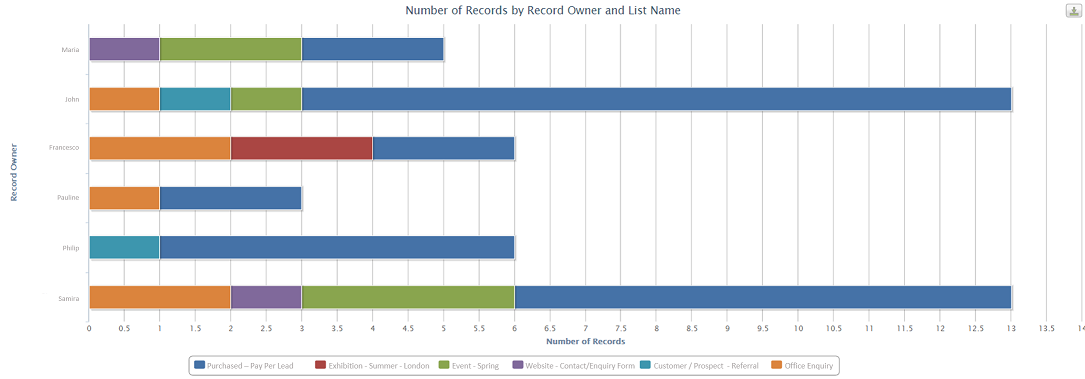
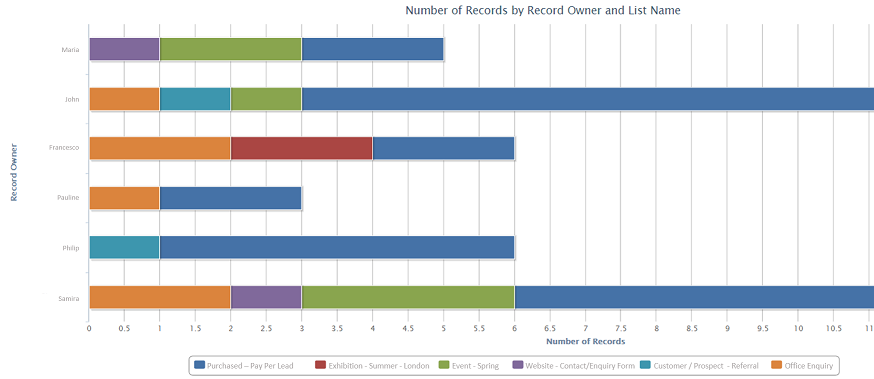
For example - this shows the number of Leads assigned to each user and which Lead List the Lead came from
From your Leads List (the default is Not Promoted and Not Discarded) filter accordingly and select create a New Chart
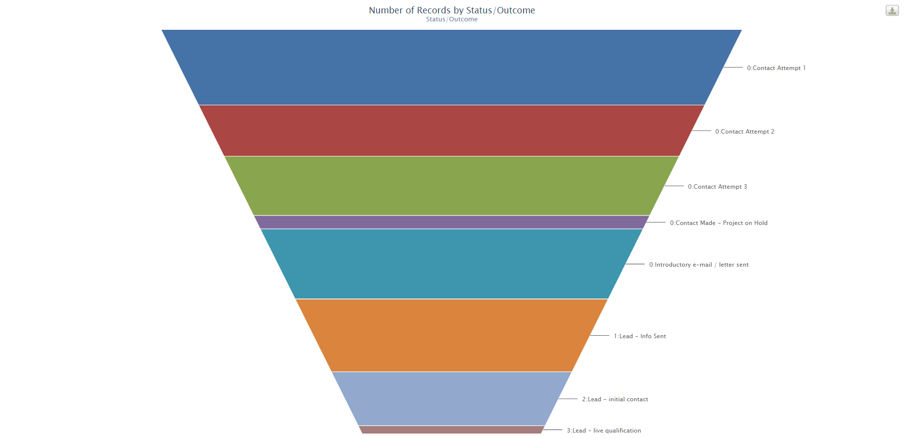
This chart shows the number of leads by outcome/status
From your Leads List (the default is Not Promoted and Not Discarded) filter accordingly and select create a New Chart
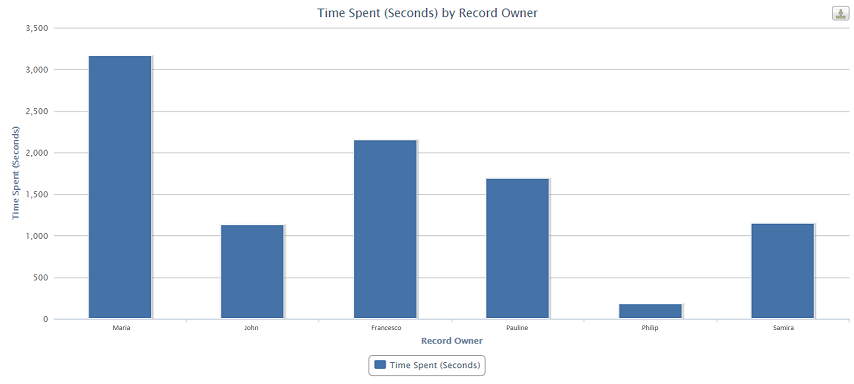
This chart shows the time spent by each user on Leads
From your Leads List (the default is Not Promoted and Not Discarded) filter accordingly and select create a New Chart
For more information see our web clips
Step 1
From the List Control area create a new Lead List called Trade Show Leads
In the Admin Console configure the Lead record to meet your requirements, adding fields, mapping to Gold-Vision items, making fields mandatory as required.
Step 2
Set up your Connect Touch Points . When a Lead clicks a link in a Connect follow up mailshot they will get a Touch Point Score.
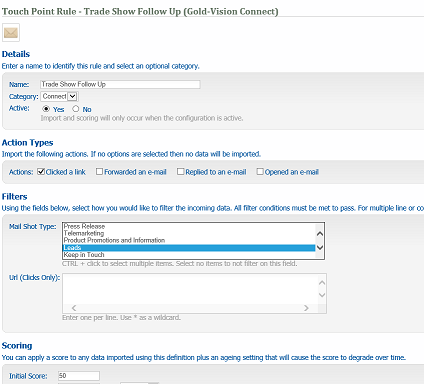
Step 3
At the show add your Leads directly to the list - using your phone or tablet
Step 4
After the show create a Campaign, send a Connect email to everyone who you met there
Step 5
Qualify your Leads
Monitor the Touch Points from recipients who have clicked on links in your mailshot and assign leads to users based on the Touch Point Score. Your telesales team can then follow up their high quality leads, based on certain criteria, by creating a favorite list of Leads over a certain Touch Point Score. If the Lead is qualified either update the Status or Promote the Lead. If the lead is not qualified yet you could set a Call Back as a reminder. Call Backs appear in the Call Back tab and also on your To Do list.
Step 6
Create Dashboards to monitor the progress of the Lead follow up
Click here to see our web clip
Requirements: Lead Management, Connect, Touch Points
Step 1
Import the csv file in to Lead Management
Step 2
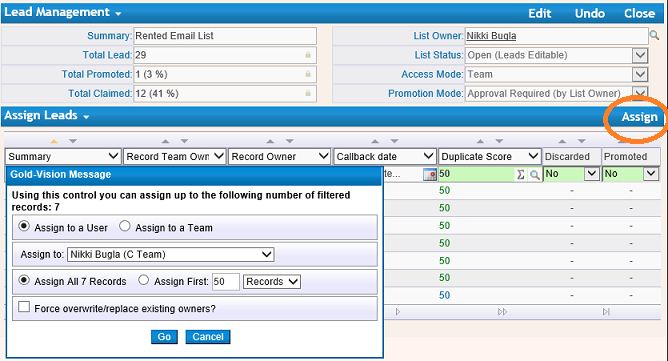
Assign Leads to your users, filter the duplicates and assign to a Team Leader
Step 3
Set up Leads Targets for the Users - daily, weekly and monthly. Create Target Charts to monitor your Team.
Step 4
Qualify the Lead
Your Telemarketing Team will automatically know that they have Leads assigned to them in their 'My Leads' list. The Lead can then be called and further information gained. The Lead Status/Outcome can then be updated to for example 'Keep Warm' and call backs created where necessary
Step 5
Once the Lead has been qualified the Lead Owner can promote the Lead
Step 6
Create Dashboards to monitor the progress of the Lead follow up
Click here to see our web clip
Requirements: Lead Management, Connect, Touch Points
Step 1
Create a New Lead List called Website Leads
Step 2
Create a Web Tracking Touch Point to create Leads if no matching record is identified in Gold-Vision or Lead Management
Step 3
Create an Alert to set an Owner then to Alert the owner that the Lead has been assigned. For example assign the Lead to the Telemarketing Team and then send an Alert to let them know a Lead has been assigned. Leads can be assigned automatically according to your criteria or manually.
Requirements: Lead Management, Web Tracking (either Lead Forensics or On Monitoring), access to Alerting
Click here to see our web clip
Step 4 Qualify the Lead
Sales person calls to qualify the lead – questions can be on the lead record, mandatory fields can be included.
Once qualified, the Lead can be promoted – an Account, Contact, Activity and Opportunity can be created, with for example a follow up activity to book an appointment.
If not qualified, the Lead can be added to a campaign source to be included in a Connect mailshot with more information about your company and your products/services or added to a Lead Nurture cycle using Marketing Automation.