Introduction
Touch Points capture interactions that businesses and individuals have with your company and brand.
These can be both digital Touch Points and non-digital Touch Points.
Gold-Vision can score Touch Points in accordance to their importance to your business. In order to gain valuable business insights, it is important to have a Touch Point scoring strategy in place before configuring the Touch Points.
Configure Touch Point Rules
Define the settings for Gold-Vision, Web tracking and Social Networks.
In order to begin importing Touch Points from the different sources into Gold-Vision you must firstly configure them.
N.B Before you configure your Touch Points you should have the following in place:
A Touch Point scoring plan – see separate document
-
If you plan to track website visits you need a linked OnMonitoring or Lead Forensics account
-
If you plan to track your social activity you need to authenticate your Company Twitter and/or Facebook accounts
-
If you plan to track your e-mail marketing you need a Gold-Vision Connect account and need to be using New mode Campaigns
-
If you wish to use Touch Point categories these must be configured
Web Tracking Touch Points
If you would like to identify your B2B website visitors, Touch Points can be combined with Web Visitor Tracking tools such as Lead Forensics and OnMonitoring. Using IP Tracking, both solutions integrate with Gold-Vision, allowing you to score visits using Touch Points. For more information, and to register for a trial with either provider, visit the Web Visitor Tracking page. If you would prefer us to initially register your interest with Lead Forensics and/or OnMonitoring on your behalf initially, please let us know.


Name – eg Pricing Page
Category – eg Web Touch Point
Action – You can choose more than one action here – ‘Web Site Visit’ will capture website visits of one or more pages. ‘Single Page / Bounce’ will capture website visits of only one page. It is likely that you choose either ‘web visit’ or both action types. Single page/bounces only track 1 page website visits so you may want to exclude these.
Filters – Here you type in the URL of the page(s) that you would like to track. You can add multiple URLs or use the * button for wildcards. For example, *pricing, would track all visits to any URL with ‘pricing’ in it. You may also want to fill out the duration of the page visit. For example, if you only wanted to track visits to a page of more than 15 seconds you would enter ‘>0.25’. This can be left blank if you want to track all visits to the page, irrelevant of how long they spend on the page. In the above example no page times were specified so this will stay blank.
Scoring – Here you enter the score for the Touch Point rule. Touch Point scores can be degraded, so that they gradually move down to zero. You can choose how to degrade the score. For example, you might want an initial score of 50 but you want this score to degrade by 10 every 7 days. You can also choose to set the score to zero after a certain period of time. For example, you might want an initial score of 100 but you want this to revert back to zero after 30 days.
There may be instances where you want to assign a negative score – this is possible by inputting a negative figure.
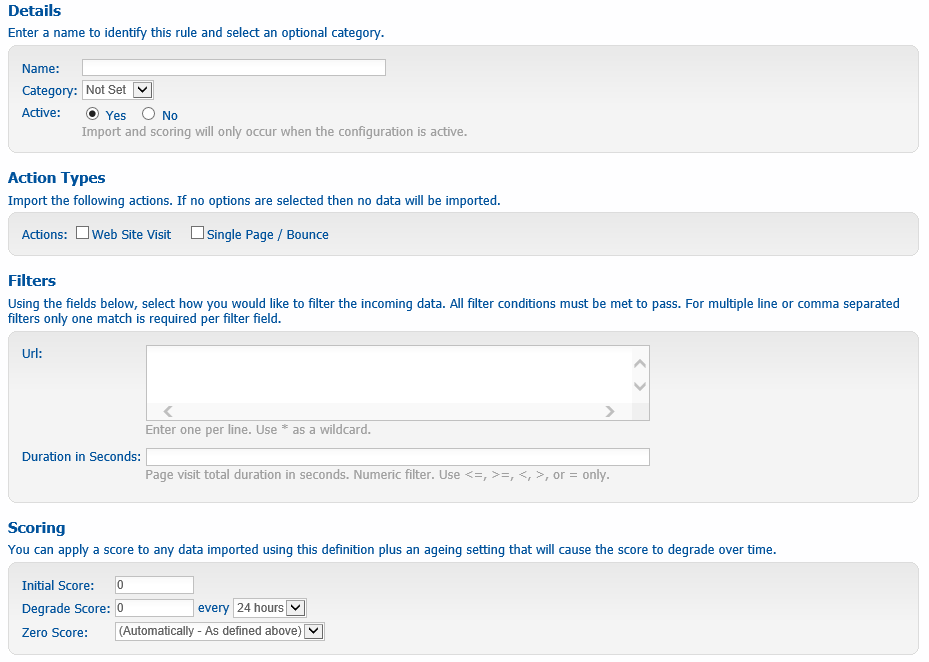
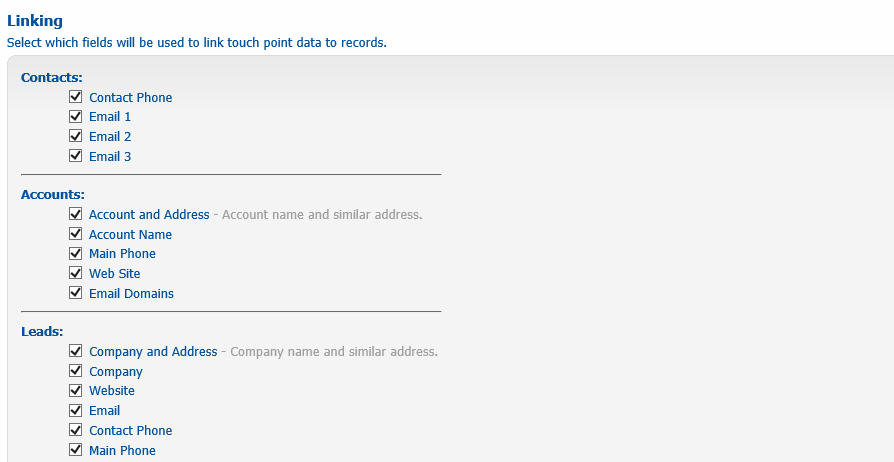
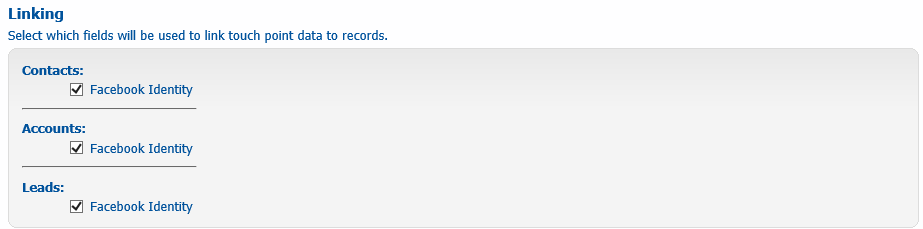
Linking – When a Touch Point is imported Gold-Vision will try to match the data against Contacts, Accounts and Leads. Here you can choose which fields to match against. It is recommended that you keep all of these ticked.
Lead Import – You can automatically create Leads from Touch Points. To do this you must tick the Lead Import box. If the Touch Point is not matched to a Gold-Vision record then it will automatically create a Lead in a list of your choice. In this example we want to create a Lead so this box is ticked.

Once you have filled out the form click ‘save’ and you will be routed back to the Touch Point configuration page. Here you will see the new rule sitting under the Import Source (Lead Forensics in this example).
Note: when setting up your Web Tracking rules we recommend a 'catch all' rule - with no URL and no score to check that the data is imported correctly from Lead Forensics or On Monitoring.
Connect Touch Points
.Please note - to use Connect Touch Points you need to be using New Mode Campaigns


Name – eg Clicked a link
Category – eg Connect
Action Types
Tick the box of the Action Type that you would like to track. For Connect you can choose between:
o Clicked a link
o Forwarded a mail
o Replied to a mail
o Opened a mail
Filters
Optional fields, but all filter conditions must be met in order for the Touch Point to be imported.
• Choose mailshot type (this is configured in the Administration Console)
• If you would like to track a specific link within Connect then enter this in the URL box. The example is not tracking a specific link so this can remain blank
Scoring
You can enter a score for the Touch Point import rule. This score can be set to degrade over time. If you do not want to give the Touch Point rule a score then you can simply leave this at zero. This will mean that the data will be imported but no score will be assigned to it.

Linking
When a Touch Point is imported Gold-Vision will try to match this against the existing Contact and Lead records.

Once you have filled out the data for the Touch Point rule click Save, you will then be directed back to the main Touch Point configuration screen and you will see the new rule sitting under the Touch Point Source.
It is likely that you will want to set-up multiple rules for Connect. These will all be listed on the Touch Point configuration screen in the Administration Console.
Group Score Rule – Each Connect session score will be calculated using the rule you choose. See Group Scoring for more information on this.
Social Touch Points
In order to begin importing social Touch Points you need to ensure that your Company Facebook Page or Twitter Account has been authenticated by the page/account Administrator


Name - eg Liked our page
Category - eg Social
Choose ‘Active’ to ensure that the rule is active
Action Type
Enter the Action Type that you would like to track. For Facebook you can choose between:
o Posted on your Wall
o Liked your Post
o Commented on your Post
Social Accounts
Choose which social accounts you would like to pull data in from. All authenticated Facebook accounts will be showing here. If you haven’t authenticated a Facebook account please go to Social Authentication.
Scoring
You need to enter a score for the Touch Point import rule. This score can be set to degrade over time. If you do not want to give the Touch Point rule a score then you can simply leave this at zero. This will mean that the data will be imported but no score will be assigned to it.
Linking
When a Touch Point is imported Gold-Vision will try to match this against the existing Contact and Lead records.
Once you have filled out the form click ‘save’ and you will be routed back to the Touch Point configuration page. Here you will see the new rule sitting under the Import Source

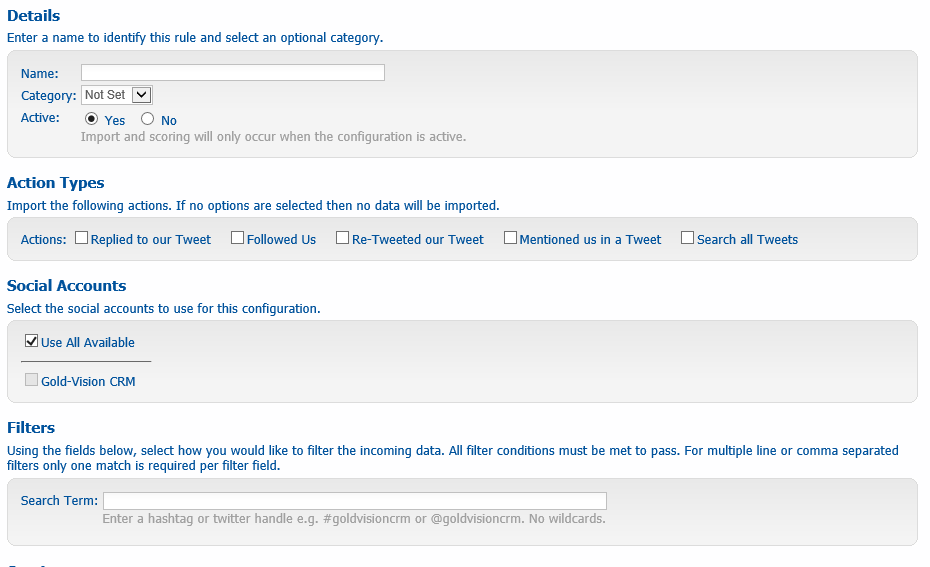
Name eg Re-Tweeted
Category eg Social
Choose ‘Active’ to ensure that the rule is active
Action Type
Enter the Action Type that you would like to track. For Twitter you can choose between
o Replied to our Tweet
o Followed Us
o Re-Tweeted our Tweet
o Mentioned us in a Tweet
o Search all Tweets
Social Accounts
Choose which social accounts you would like to pull data in from. All authenticated Facebook accounts will be showing here. If you haven’t authenticated a Facebook account please go to Social Authentication.
Filters
If you choose ‘Search all Tweets’ you must enter a search term in the filter. This can be a hashtag or a twitter handle. Warning – if you enter a popular hashtag, such as #crm, you will import a considerable amount of data which is not advisable.
Scoring
You need to enter a score for the Touch Point import rule. This score can be set to degrade over time. If you do not want to give the Touch Point rule a score then you can simply leave this at zero. This will mean that the data will be imported but no score will be assigned to it.
Linking
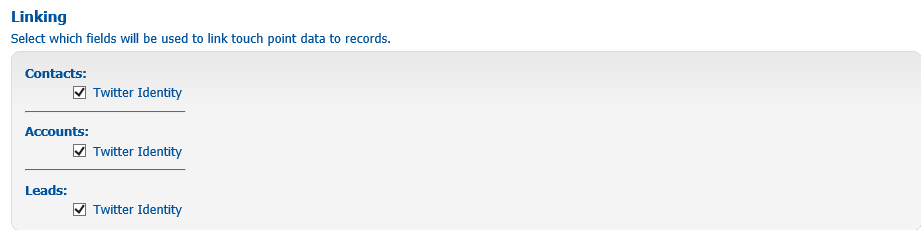
When a Touch Point is imported Gold-Vision will try to match this against the existing Account, Contact and Lead records. This area allows you to choose which fields will be used to link Touch Point data to these records. It is advisable to keep all of these boxes checked in order to get as many Touch Points linked to records as possible.
Once you have filled out the form click ‘save’ and you will be routed back to the Touch Point configuration page. Here you will see the new rule sitting under the Import Source
Gold-Vision Touch Points
Gold-Vision Touch Points can be set up to manually give a score, for example you might wish to assign a Touch Point after a positive conversation with a Lead or a Contact. Set up the Touch Point as below then when adding a note there is the option to add a Touch Point. They can also be set up to be used in Alerting

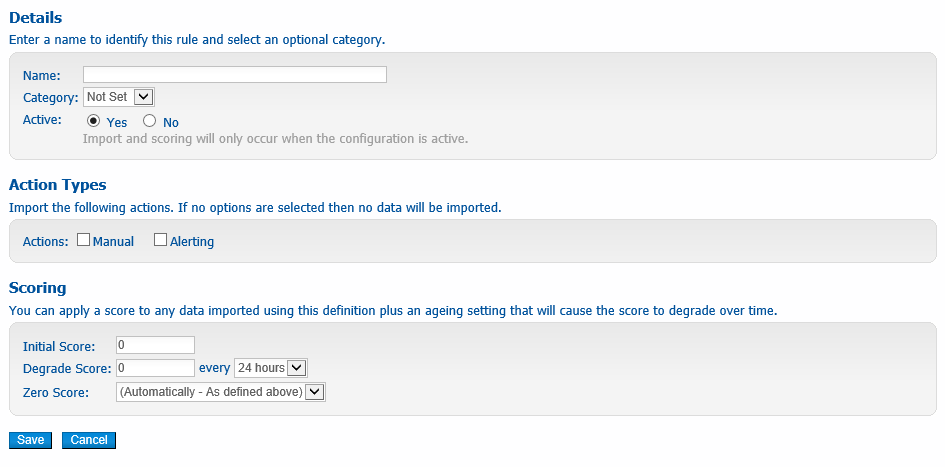
Enter the name of the Touch Point rule
Category eg Manual
Choose ‘Active’ to ensure that the rule is active
Action Types
Enter the Action Type that you would like to track. For Gold-Vision you can choose between:
o Manual – the Touch Point is available when adding a note in Gold-Vision or Lead Management
o Alerting – the Touch Point is available in Alerting
Scoring
You need to enter a score for the Touch Point import rule. This score can be set to degrade over time. If you do not want to give the Touch Point rule a score then you can simply leave this at zero. This will mean that the data will be imported but no score will be assigned to it.
Once you have filled out the form click ‘save’ and you will be routed back to the Touch Point configuration page. Here you will see the new rule sitting under the Import Source
Settings
Touch Point Settings
Import Poll Interval (Minutes) - configure the import poll for Touch Point activity.
Score Re-Calculate Interval (Hours) - configure the frequency of when score updates should be synced back.

Touch Point Categories
Define the colour scheme for Touch Points

Create a new Category and select a colour: