Scenarios
|
Campaign
|
Touch Point AutomationAutomate Touch Points to create Alerts and Activities. Never miss an opportunity.
|
Module Cost
|
Scenarios
|
Campaign
|
Touch Point AutomationAutomate Touch Points to create Alerts and Activities. Never miss an opportunity.
|
Module Cost
|
Marketing Automation enhances some of the standard Gold-Vision and additional module functionality in order to truly align Sales & Marketing.
Campaign Automation
Automate your Gold-Vision Connect campaigns and use them to drive engagement with automated email sequences from welcome campaigns to nurture cycles as complex as you require.
Combine automated Connect campaigns with Lead Management to nurture leads through your cycle, allowing you to respond in real-time to any interaction.
Schedule your campaigns by delaying the follow up stages and fully automate phone activities or call backs.
Touch Point Automation
Automate alerting based on Touch Points; for example: alert your sales team when one of their customers is looking at a new product on your website. Next, you can use this information to automatically create follow up activities.
You can additionally create Touch Points from alerts.
For more information, please contact your Account Manager or see our Web Clips
Managing data under GDPR is something we all need to have under control, but rather than having to be a manual drain on resource, you can use automation to manage the heavy lifting.
Using Marketing Automation, you can set up a simple automated flow to ensure any new contacts added to your CRM database receive a copy of your Privacy Notice the same day! Automating this process removes the risk of breaching the 30-day limit for notification, and means you won't have to rely on your users to ensure this is maintained (as required under GDPR).
An automated campaign might look as follows:
Step 1
Create your Campaign Source. A Campaign Source is created and added to the first stage which includes all contacts created today.
Step 2
The mailshot is scheduled to send to “New Recipients Only” on a repeated schedule which might be the same time each day, or even hourly.
Gold-Vision Campaigns allow you to manage when privacy notices are sent and can automatically write to a contact “Privacy Log” to ensure the date and time of notification is logged.
Step 3
Create an automated template in Gold-Vision Connect to manage automated privacy notifications and send them at the required schedule.

Step 4
Create a follow-up stage with a second email to the contact requesting they update their contact preferences.

When the contact updates their preferences this data will link straight back to their contact information in Gold-Vision.
Step 5
Marketing automation isn’t just for email, you can also manage rules for additional stages that require a different type of follow-up.
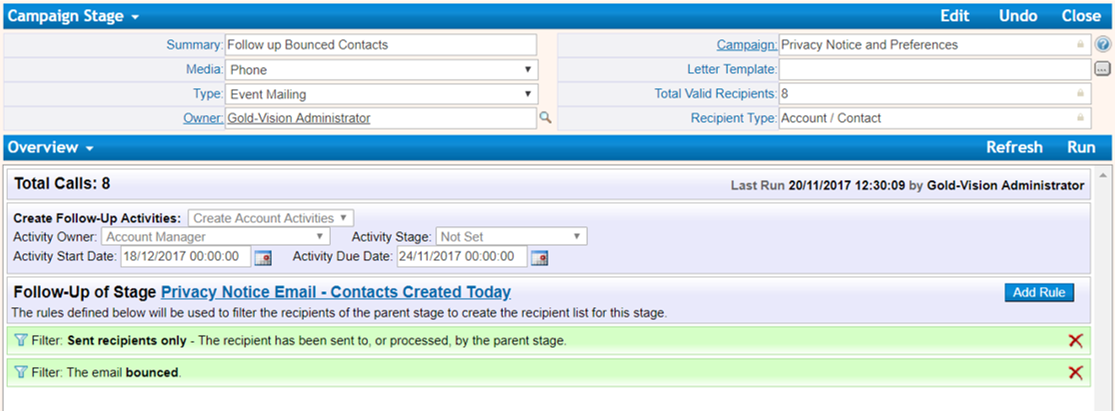
For example, you may wish to create a follow-up campaign which runs at the end of the day to automatically create a follow-up activity for the Account manager to give the call anyone to whom the Privacy Notice email bounced.
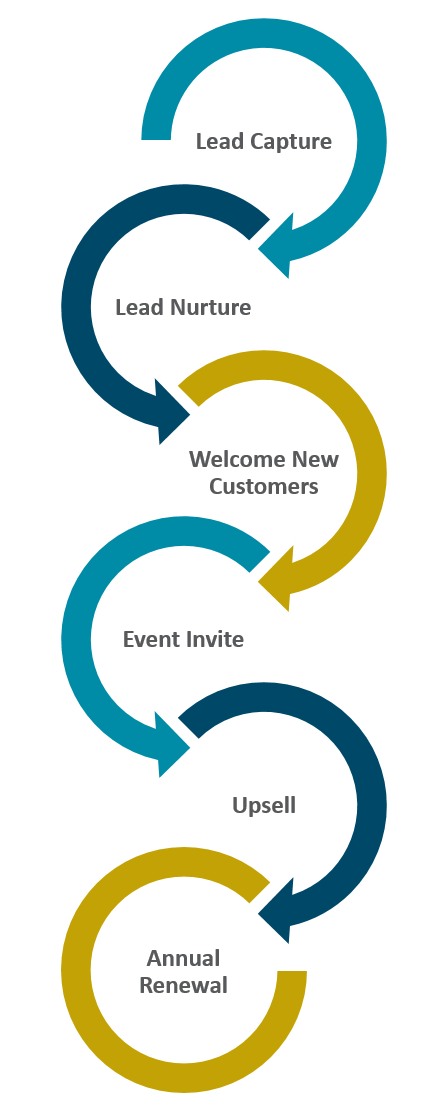
Marketing Automation can be applied to the entire Gold-Vision’s Marketing Automation module consists We’ve set up this example series to show how you can There is a good mix of Campaign types below, so you |
 |
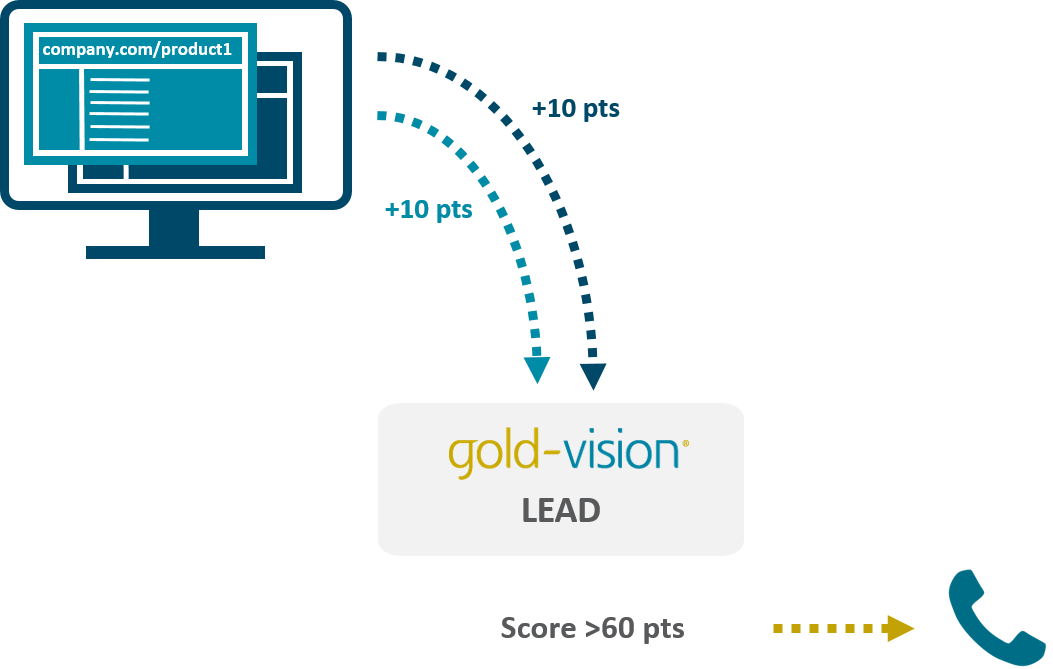
Using web tracking Touch Points in Gold-Vision allows you to identify when a Lead visits an important page on your website.
This may be a specific product page, your pricing page, or a set of pages that you’ve identified as key.
The best time to contact a Lead is when they have already decided to spend time looking at your company. Imagine if your team could call and qualify new website visitors that visited your pricing page, just after they visited? It’s easy with Gold-Vision Touch Point alerting.
How to set up Lead Capture:
Click here to see our web clip
Requirements: Marketing Automation, Lead Management, Touch Points, web tracking, alerting
Step 1
Set up your web tracking Touch Points in the administration console and choose one or more specific pages that are of interest. Don’t forget to tick the box to create new Leads if they don’t already exist.
Step 2
Set up a new Lead Touch Point alert in the administration console. Set your specific page(s) using the Touch Point Configurations options, and set the ‘Raises Over’ Touch Point score.
Next, add an action. We’ve chosen to Raise an Alert in Gold-Vision for Team A, although you could do this by email if you prefer. Team A could be your marketing team or whoever you assign the initial follow up to in your business.
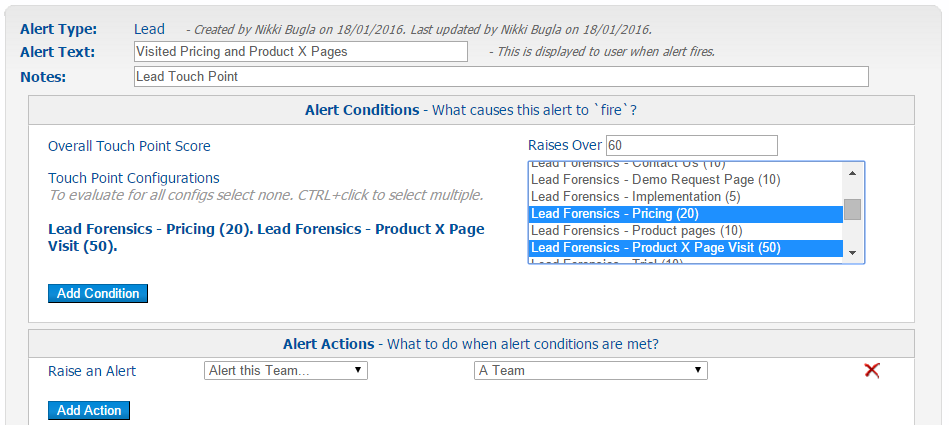
What happens next?
When a Lead visits the selected pages on your website and reaches a score of 60, all Team A members will get a Gold-Vision alert, prompting them to follow-up / qualify the Lead.
|
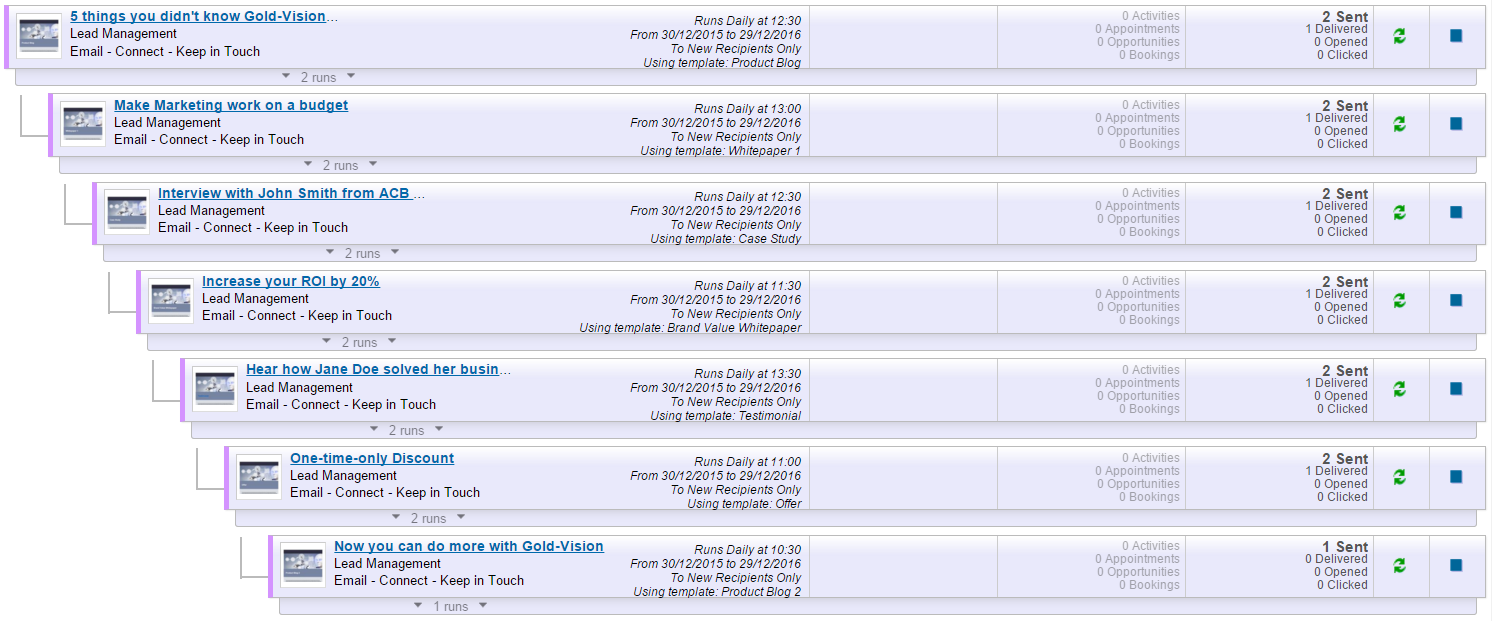
What do you do with a Lead that is relevant to your business, but not ready to buy? Pop it into a Lead nurture cycle of course! You want to ensure that your product/service stays top of mind, and you can pick up on their buying signals to contact them at the right time. This series sends an email every 10 days to all Leads with a Lead status of ‘Keep Warm’. Whenever a Lead clicks on the link in the email, they receive a score of 10 Connect Touch Points. When a Lead reaches a high enough score, the Lead owner receives an alert. This is a prompt to see if the Lead is ready to buy! How to set up Lead Nurture: Click here to see our web clip Requirements: Marketing Automation, Lead Management, Campaigns, Gold-Vision Connect, Touch Points, alerting Step 1 Design your Automated Email Templates. You’ll need to design an automated email template in Gold-Vision Connect for each Campaign Stage, with a link that leads to something useful. This could be a link to a blog, case study, whitepaper, ebook, testimonial, video, offer, etc. As soon as you start the automated email template in Connect, it is ready to send. Step 2 Set up your Connect Touch Points. In the administration console navigate to Data > Touch Points > Configure Touch Point Rules. If you’d like to be more specific, you can type the specific URL of each link into the URL box – meaning only this link will receive scores (as you may have other links in your emails that you don’t want to score).
|
Step 3 Set up your Automated Campaign. In Lead Management, create your Campaign Source by filtering to Leads with a Lead status of Keep Warm, which are not promoted or discarded. Once set up, your sales team can set their Leads to ‘Keep Warm’ and they will automatically be added to the Source, and therefore the nurture cycle.
It’s really easy to set up the rest of the Stages, and there can be as many as you like!
Step 4 Set up your Touch Point Alert: Now you can leave your nurture series alone, knowing your sales team can place Leads into them, and then draw them out when they are ready to buy. If the Lead is promoted or discarded it will be removed from the Campaign Source and therefore will no longer receive any more emails in this Lead Nurture series. |
|
 .
.
Hurrah! After capturing a Lead and nurturing it up to the crucial purchase decision, you’ve won a new customer! Great news! So, that’s that for marketing automation, right?
Wrong! Many Marketing Automation solutions position themselves as a ‘Lead only’ tool. The main reason for this is they run inside their own product database, separate to CRM. Once a Lead has become a customer, typically it would move out of the Marketing Automation solution and into CRM. But Gold-Vision is a truly integrated solution, and once your Lead has converted into a customer you can still use automation!
One common requirement is a welcome series to onboard new customers, such as the example below:
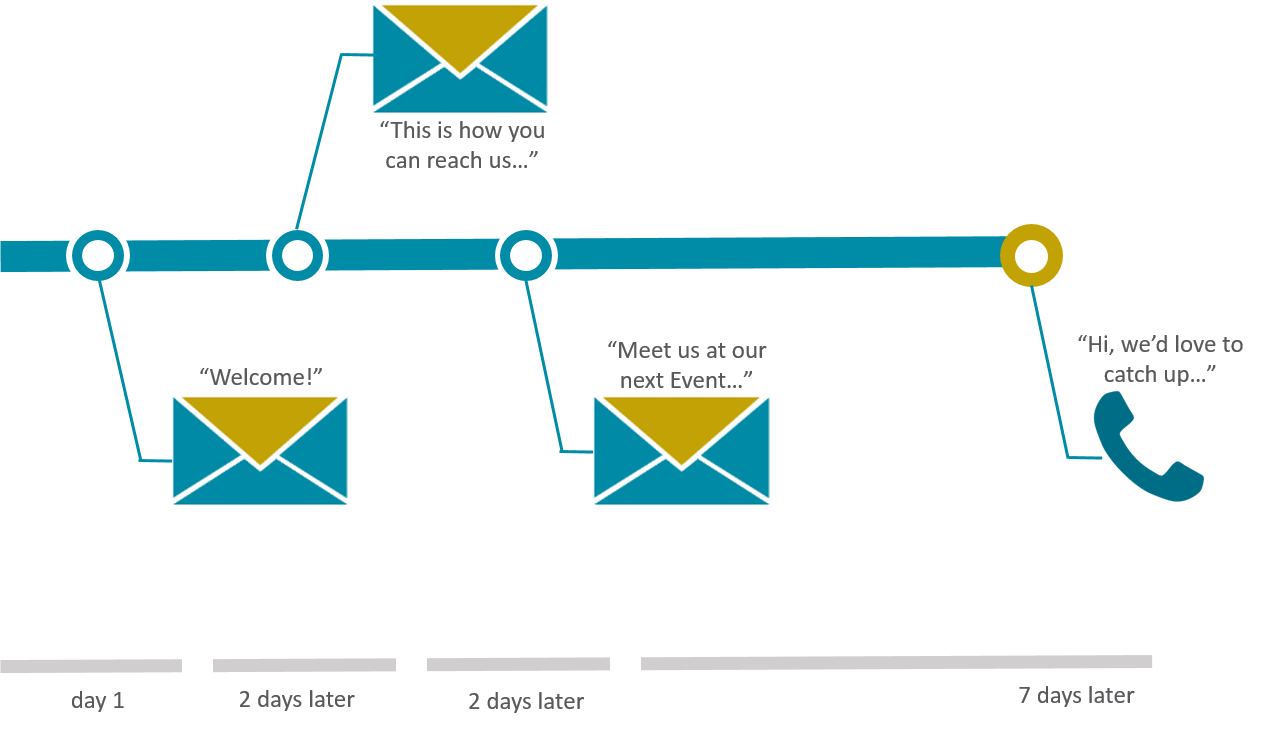
The series includes a welcome email, an introduction to help and support contact details, an event calendar and finally a follow up call from their Account Manager. Ensure you have set up and started your automated email templates in Gold-Vision Connect, and then it takes minutes to set up the Campaign.
How to set up the Welcome Series in 3 minutes:
Click here to see our web clip
Requirements: Marketing Automation, Campaigns, Gold-Vision Connect
Step 1
Create and start your automated email templates for the welcome email, contact details and event calendar in Connect.
Step 2
Set up your automated Campaign. Create a Campaign Source of your customers by filtering a list in Gold-Vision. Be conscious to create a Source that will only include customers from the date you would like your Campaign to start on, to avoid sending all of your existing customers the welcome series when you turn it on!
Create a new Campaign, add your first Connect Email Stage ‘Welcome Email’ and include the ‘Customers’ Source.
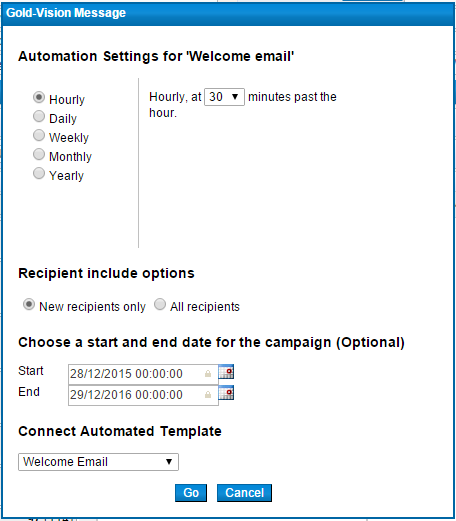
Run your Stage ‘Repeatedly or On a Schedule’, choose your automated template from the drop down options, and set a start and end date. This Campaign Stage only runs to New Recipients, every hour at 30 minutes past. This means that any new customer will automatically be added to this Campaign Stage, and sent a Welcome Email within an hour of becoming a new customer in Gold-Vision.
Add in 2 more Connect Follow Up Stages for the contact details and event calendar, and make sure to involve these 2 rules:
1) Send to Sent Recipients only (will set automatically as default)
2) Delay Sending by 2 days.
This will ensure that your new customers will receive each Follow Up Stagetwo days after the previous email. Set up the automation by running your Stages ‘Repeatedly or On a Schedule’ and choose your time of day to send, when to start and end the Campaign, and select your automated email template from the drop down list.
Step 3
Finally, add in your final Follow Up Stage. This time select Phone as your media type, add your rules (this time we delay the final Stage by 7 days) then set up the kind of activity you would like. We’ve set the Stage to ‘Create Account Activities’ for the Account Manager, meaning your new customer’s Account Manager will receive an Account Activity to call their customer 7 days after they receive the event calendar email.
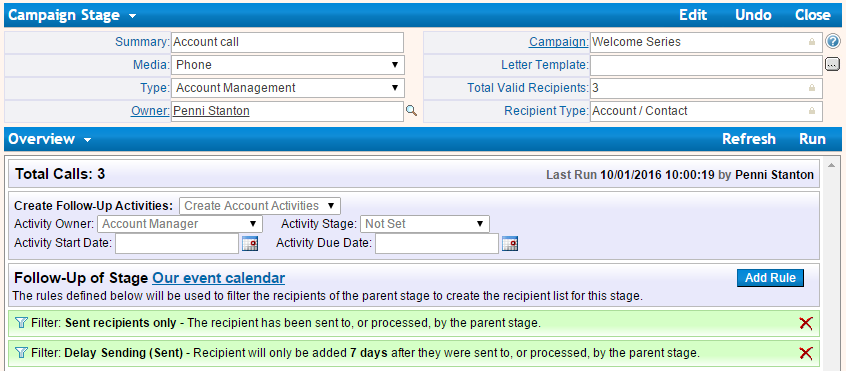
Run your Phone Stage ‘Repeatedly or On a Schedule’ to set up the automation, we’ve set ours to run Daily at 10am.

Manually sending event invitations, confirmations and instructions at the optimum moment can be a real time sink for your team. This automated email series will sell the maximum number of tickets whilst providing fast confirmation emails, and on-time event instructions. Set it up on day one, and then sit back and leave Marketing Automation to do the work!
This series includes three invitation emails, to ensure maximum bookings. At the same time, following every booking your attendee will automatically receive an email confirmation and event instructions closer to the event date.
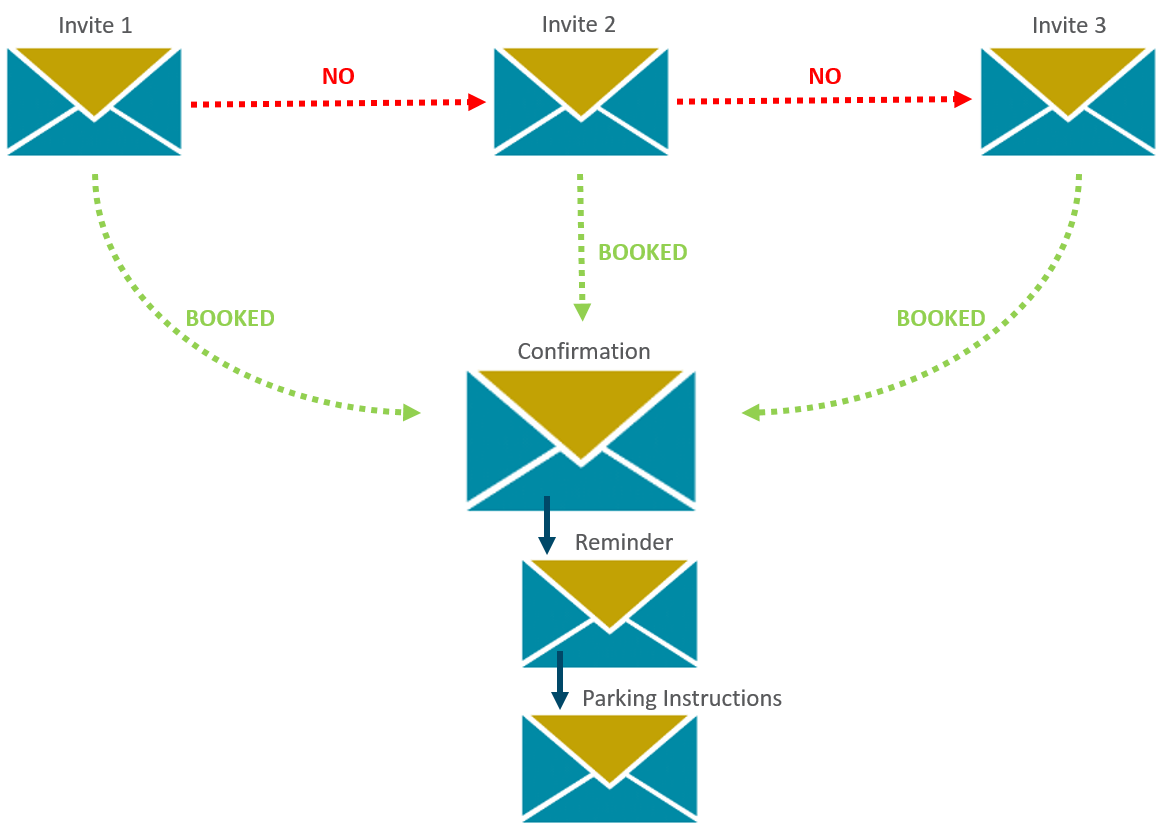
How to set up the Event Invitation Campaign:
Click here to see our web clip
Requirements: Marketing Automation, Campaigns, Gold-Vision Connect
Step 1
Create and start your automated email templates for the invitation emails, the confirmation and further instructions in Connect.
Step 2
Set up your automated Campaign. Create a Campaign Source, which should be a list in Gold-Vision of all the contacts you would like to invite to your event.
Create a new Campaign, add the first Email - Connect Stage ‘Event Invitation’ and drag your Campaign Source into the included list. Run your Stage ‘Repeatedly or On a Schedule’ to access Marketing Automation.
Choose your Automated Email Template from the drop down options, and set a start and end date for your Stage. This Campaign Stage will run Once to All Recipients, on a Thursday at 10am, so your selected start and end dates should only include one Thursday, otherwise your invite will be sent more than once.
Step 3
Create another Campaign Source of all confirmed bookings for your event, we’ve named ours ‘Confirmed Attendees CRM Event’. Then create a second Campaign Stage to send out your second invite. Again, this should be using Connect as the media type. Drag your invitation Campaign Source into the included box, and then drag your confirmed booking Campaign Source to the excluded box, as shown below. This second Stage is now set up to send to all of your chosen contacts to invite, minus those who have already booked.

Run the Stage, selecting ‘Repeatedly or On a Schedule’ and set it up just as the previous Stage but at a later date.
Repeat Step 3 once more to set up your ‘Last Minute Tickets’ email, to send a week or two before your event. You now have a fail-safe invitation system, with three emails ensuring you receive maximum bookings without annoying those who have already booked!

Step 4
To set up automatic confirmation emails to those who book onto your event, set up a new Email – Connect Stage and drag your Campaign Source ‘Confirmed Attendees’ into the included box. Run ‘Repeatedly or On a Schedule’ and set up your automation to send Hourly to New Recipients, setting the end date on the last day you will accept new bookings for your event.
You may want to send reminders, agendas, location information and other such necessities to your attendees near to an event. This is easy to do with Marketing Automation.
Create a Follow Up Stage to your confirmation email, with Email – Connect as the media type, and add the default rule of ‘Sent recipients only’. This means your Stage will be sent to anybody who has received the Confirmation email. Automate sending, to run Once to All Recipients at a date close to your event.
We’ve added a second follow up Stage to send on the day before the event with parking instructions to make our attendees lives easy. Just automate it to send once for the day before the event. Easy!

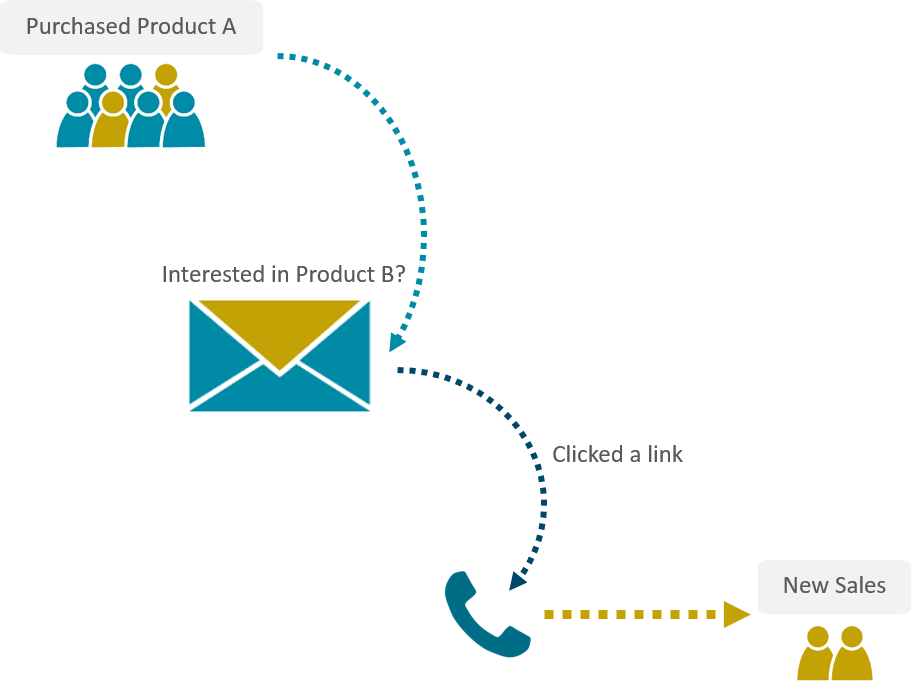
Marketing Automation is a great tool for additional sales! If you sell a range of products, you could send automated emails to customers suggesting additional complimentary products they may want to buy. Bought a dining room table? Maybe you’d like some chairs with that! Bought a printer? Maybe you need some ink? Purchased tickets to an event, maybe you’d also be interested in this other event? For this example, we’re simply calling them Product A and Product B.
This series sends an automated email promoting Product B whenever a customer purchases Product A. If a customer clicks on the email link to learn more about Product B, the series automatically creates a follow up phone call for the customer’s account manager, to get on the phone and sell Product B! The series can also work in the opposite direction: if a customer purchases Product B, they’ll receive the email about Product A, and the telephone call if they click on the link.
How to set up the Up-sell Campaign:
Click here to see our web clip
Requirements: Marketing Automation, Campaigns, Gold-Vision Connect
Step 1
Create and start your automated email template in Connect.
Step 2
Create two Campaign Sources in Product Sales. The first should be a filtered list of all customers who purchased Product A, the second would be a list of all customers who purchased Product B.
Create a new Campaign and add a new Email – Connect Stage. Drag your Campaign Source of Product A sales into the included column. To avoid upselling Product B to customers who have already purchased it, drag your Product B Campaign Source into the excluded column. We’ve also excluded any customers with open opportunities, which may or may not be applicable depending on your business processes.

Now run the Stage ‘Repeatedly or On a Schedule’, choosing your automated template and setting it to run Weekly to new recipients only. Now, every time somebody purchases Product A, they will automatically receive an email promoting Product B, unless they have already purchased Product B or have an open opportunity.
You may sell the type of product where this is sufficient. A customer can click on the link to Product B and purchase. Job done. However, if you sell something with a longer sales cycle – this click may only be the first step to purchasing. You may want to nurture this action, and get your sales team involved.
Step 3
Set up a Follow Up Phone Stage. This Campaign Stage will create a phone follow up activity for the Account Manager of any customer who clicks on the link to learn more about Product B. Add a rule; Connect – Clicked Any Link. If you prefer to be more specific, you can choose ‘Clicked a Specific Link’ and the url of the link that directs your customer to Product B. Set the follow up activity settings:

Run your Phone Stage ‘Repeatedly or On a Schedule’, setting it to run Daily. Now your Account Manager will automatically receive a Follow Up Activity every time one of their customers clicks on the link to learn more about Product B.
You can set up this process as many time as you like. We’ve set it up twice – once promoting Product B to customers who purchased Product A, and vice versa.

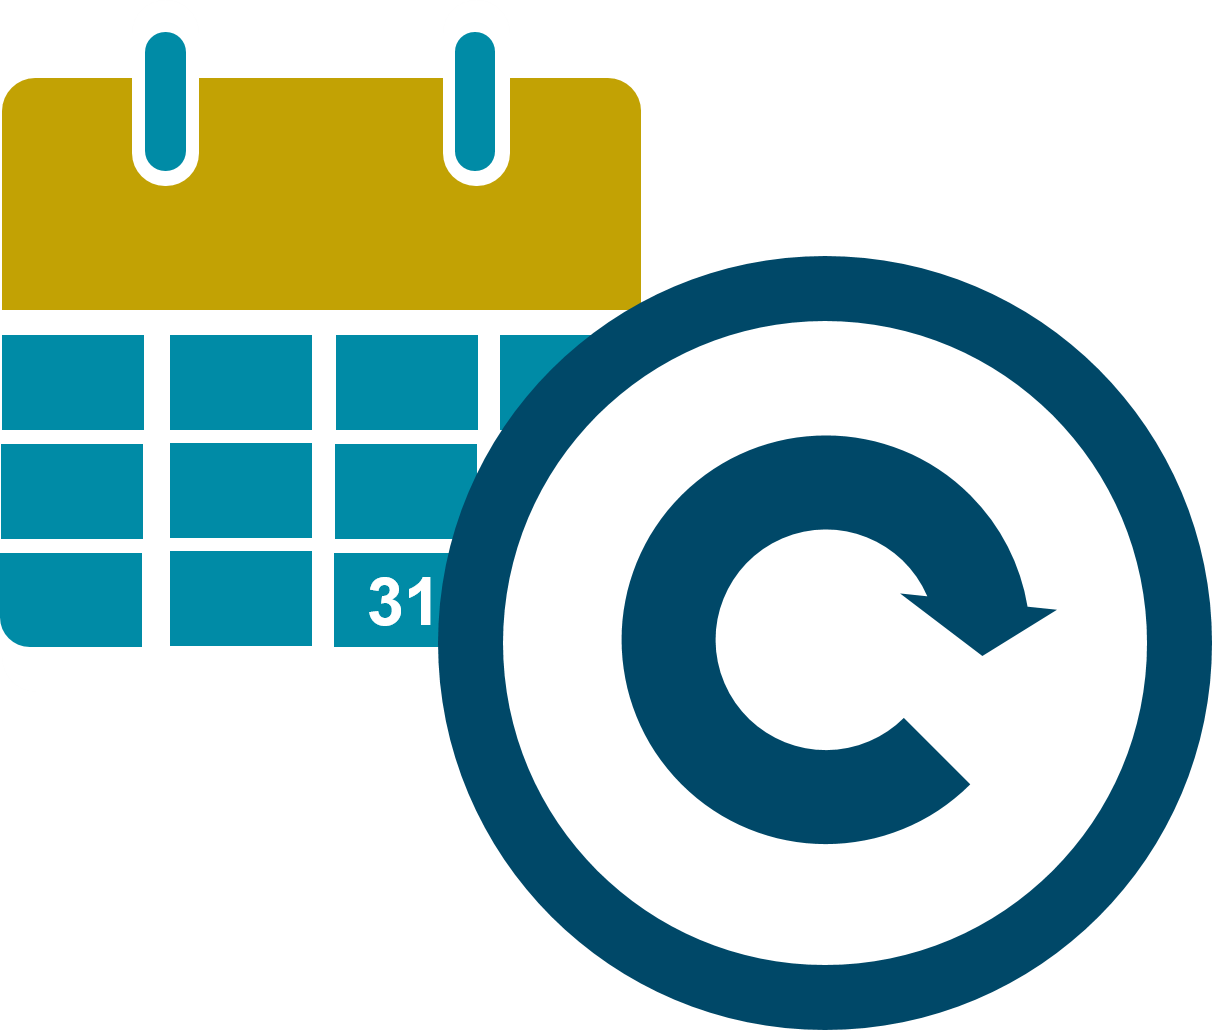
Remembering annual reminders for different customers can be a chore, especially when they all happen on different dates. Whether you need to remind someone of an annual check-up, service, payment or appointment, it’s all possible with Marketing Automation.
How to set up the Annual Renewal Campaign:
Click here to see our web clip
Requirements: Marketing Automation, Campaigns, Gold-Vision Connect
This one is a one-Stage Email – Connect Campaign that can run indefinitely.
Step 1
Create and start your automated email template in Connect.
Step 2
Create your Campaign Source. Filter your list, which could be activities, opportunities, profiles, or anything with a due date, to ‘next month’. This should produce a list of all of your customers who are due to renew something next month.
Set up a new Campaign, and create a Stage. The media type should be Email – Connect, and drag your ‘renewal date’ Campaign Source to the included column. Save and run ‘Repeatedly or On a Schedule’ to access Marketing Automation.
Choose your Automated Template, a start date and set it to run Monthly to New Recipients only on the 1st day of each month. If you don’t set an end date, your Campaign Stage will run indefinitely.
That’s it! On the first day of every month your Campaign will send an email to all customers whose renewal is the following month.
Setting up a new Automated Connect Campaign always involves these steps:
1. Create one or more Automated Templates in Connect
2. Start the Mail Shot in Connect
3. Set up the automated Campaign in Gold-Vision
4. Run the Stage in Gold-Vision
Connect has a separate feature to allow setup and sending of Automated Connect Mailshots.
Create a new Automated Mailshot in Gold-Vision Connect:
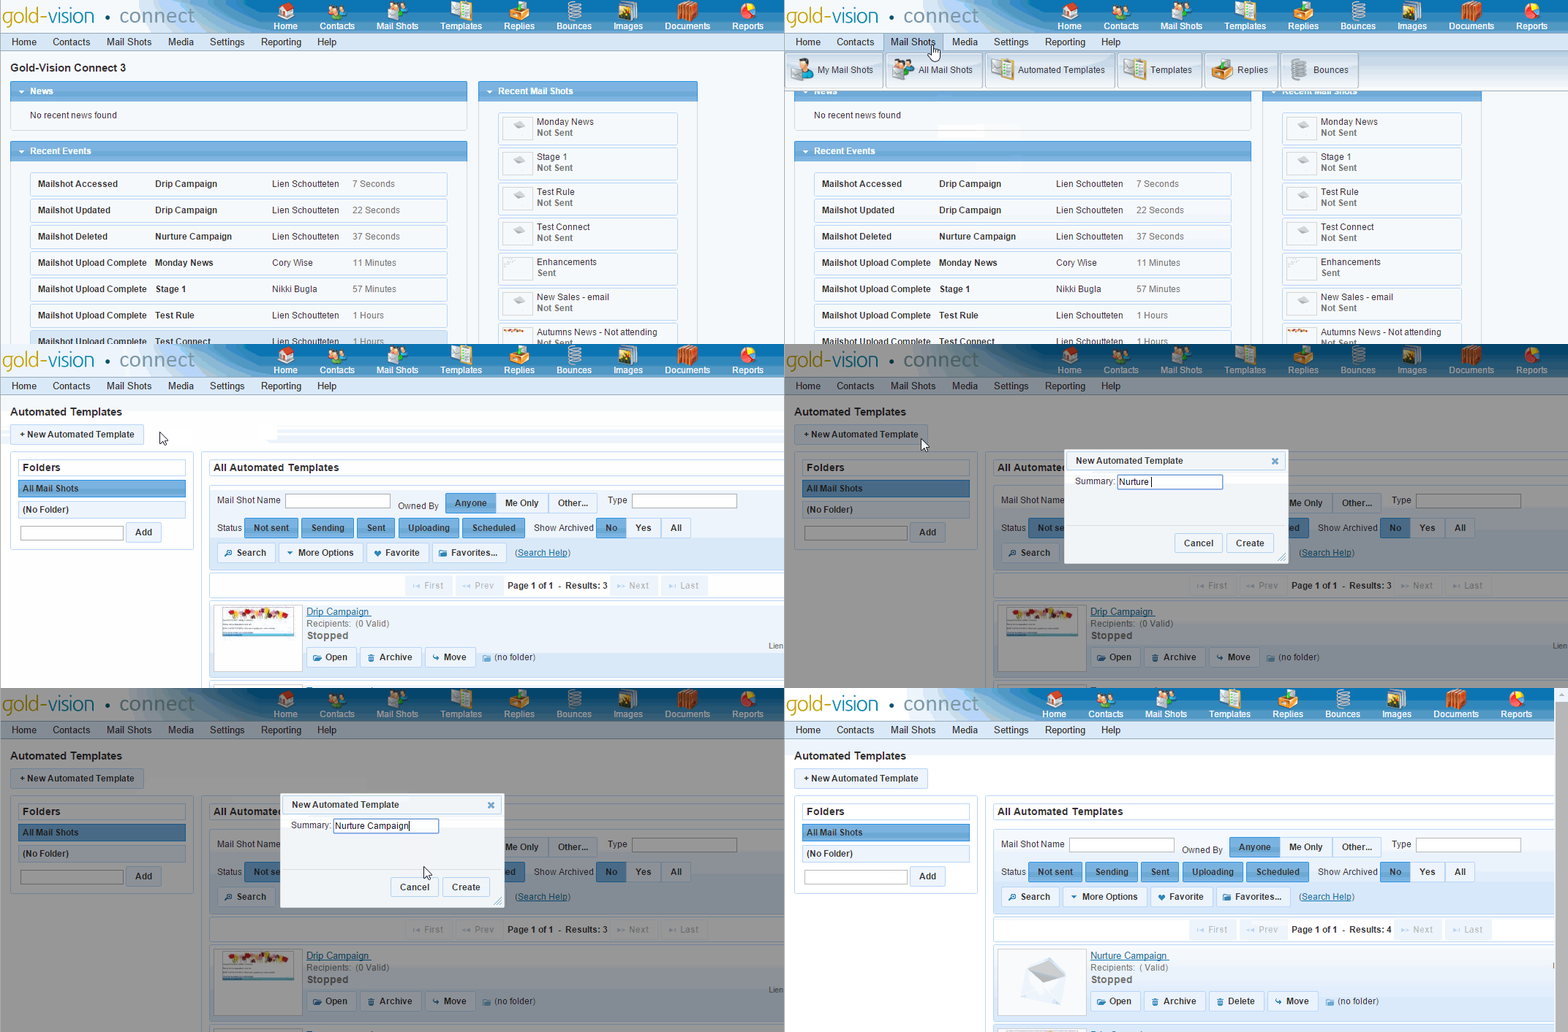
Design your Mailshot Template as normal by either embedding your html or creating a new design.
From within the design tool you can select another template to copy if required.
Preview your mailshot as normal and run the Spam Check. Select the Send tab and ensure you have ticked to agree Mailshot terms.
For more information, go to Connect Help.
Clicking Start will prepare your Mailshot to run. You are now able to select the Mailshot Template from within Gold-Vision.
Go to Gold-Vision, and set up a Connect Campaign with a Connect Stage.
After you click Run, select Process repeatedly or on a schedule to automate the Stage.
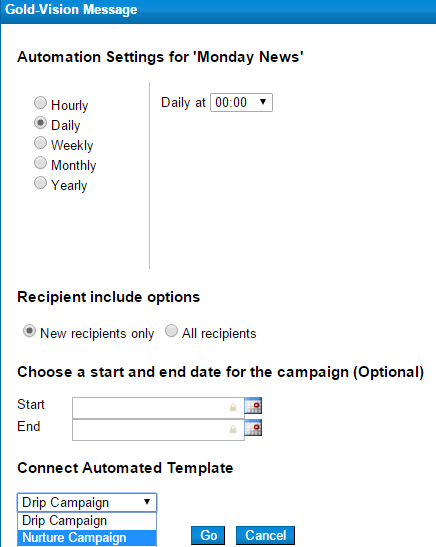
Automation Settings
How regularly would you like to send the Connect Mailshot?
New Recipients Only
The Mailshot will only send to new recipients within the Campaign Source.
All Recipients
Choose this option if you send a general mailshot related to specific products or offers on a regular basis.
Example: send a monthly email to customers to direct them to your website page for monthly offers on stock.
! Note – In this case, keep your template generic, as it cannot be changed.
Start and end Date
If dates are not provided, the Mailshot will continue to run.
Connect Automated Template
All Automated Connect Templates will appear here.
Go
Go means the Recipients will be automatically uploaded to the Connect Template, and will send according to the Automated schedule.
! Note – Please ensure that the Automated Template is ready to be sent and that you have clicked Start in the Automated Template.
Go to the Campaign Overview to see how the Automation Settings are set, and which Template has been applied.
Clicking the Stop icon will stop the Automation.
To check the progress of your Automated Campaign, go to Connect and open the Automated Runs tab in the Automated Template.
From All Automated Templates, you can view whether a mailshot is set for Automated Sending or has been Stopped.
Use the Delay Sending rule in a Follow Up Stage to delay when the next Stage is sent.
Example using Gold-Vision Connect
You want to send a second email as part of your automated nurture Campaign, but only to the Recipients who opened the first email.
Rather than giving the impression that your company is bombarding them with emails, you delay the second email by 2 days.
Run the Stage and select Process repeatedly or on a schedule. Choose the Timing, your Connect Automated Template and Go.
Recipients who opened your first email will be added to the Stage and then be automatically uploaded to Connect.
You can choose to automate the Follow-Up Activities to a Phone Stage. This is particularly interesting if you want to automatically include new recipients to an existing Campaign. This is usually a manual process, but with Automation, this becomes fully automated.
Follow the normal Phone Campaign steps:
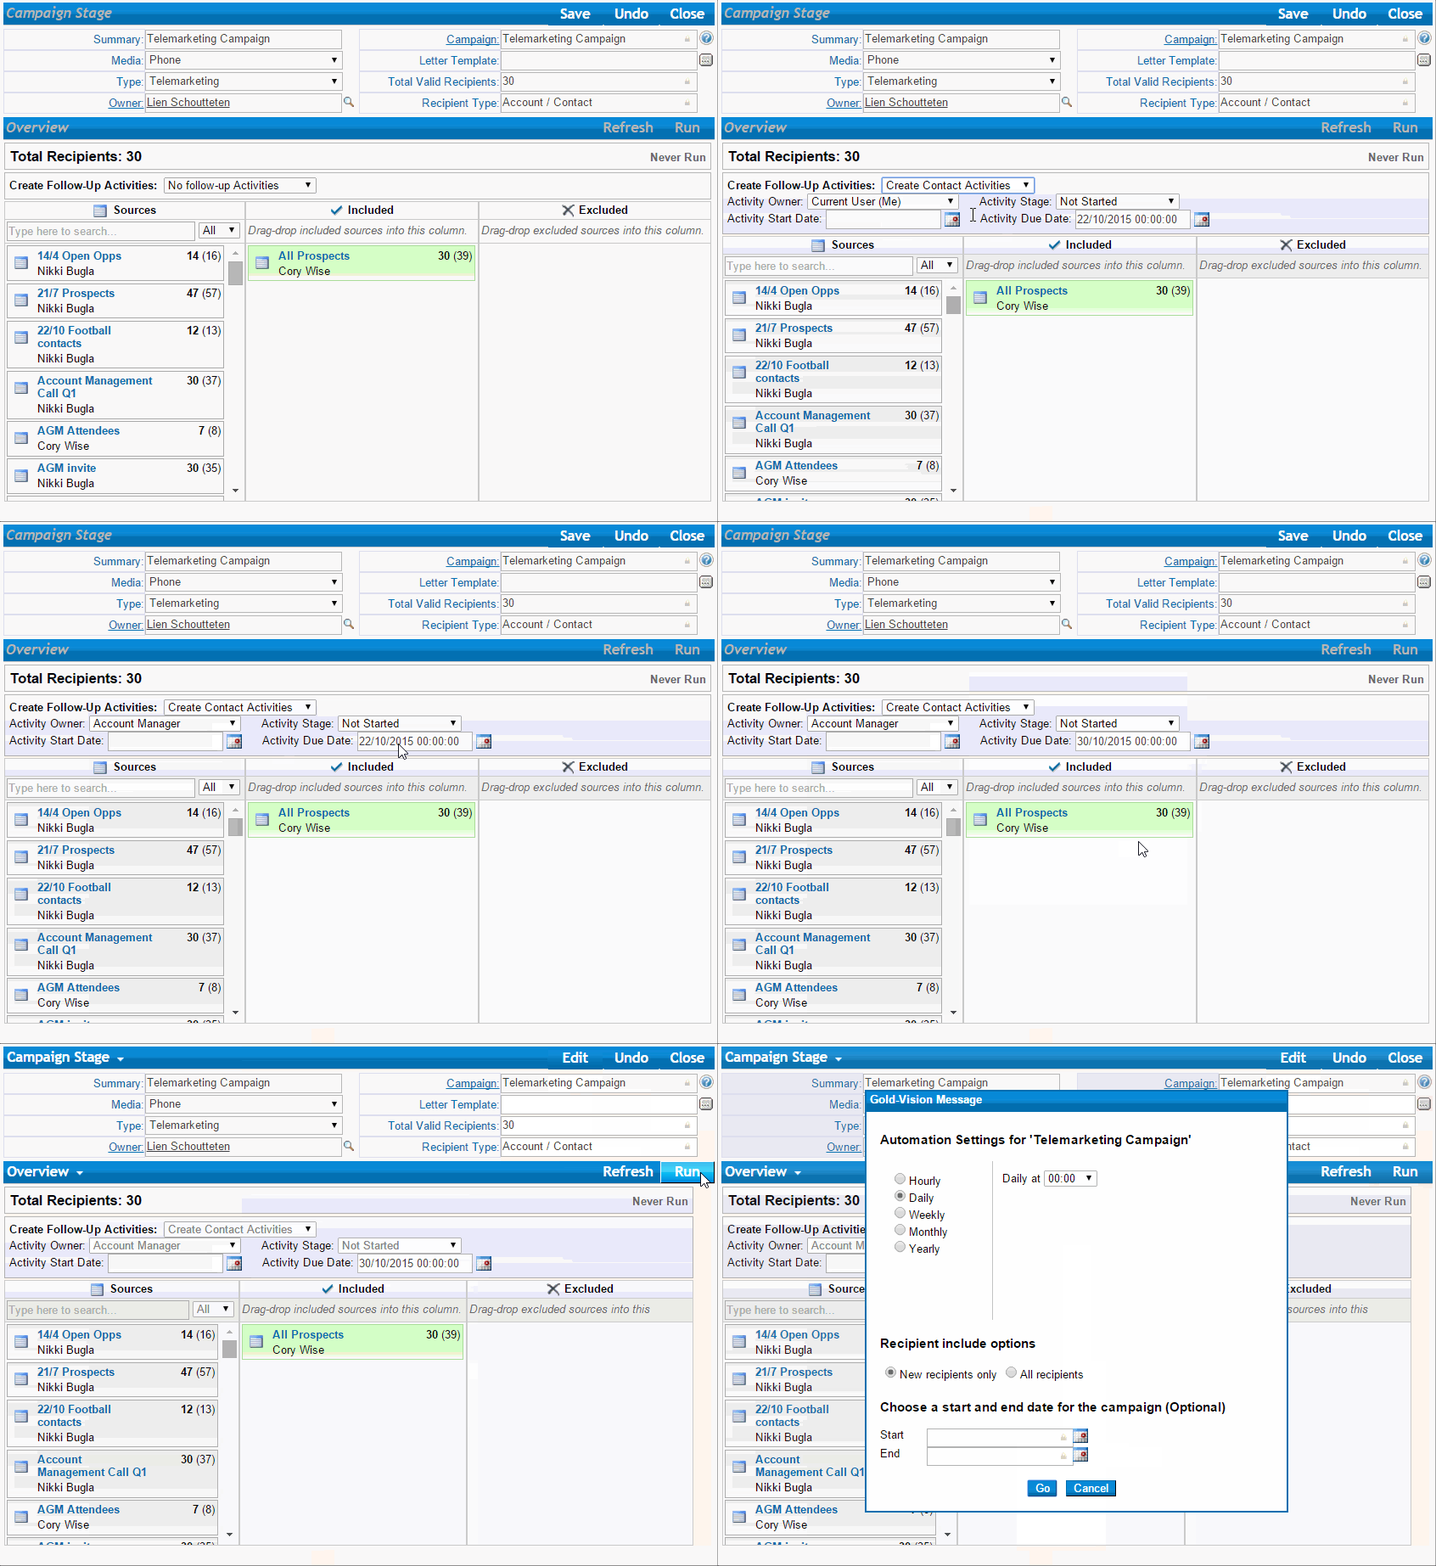
When you choose for an automated Run, you will be able to set your Automation Settings:
From these Settings, you can select the frequency and time of your automated Run,
whether you create the Activities only for New Recipients or for all, and the start and end date for the Campaign.
Go to the Campaign Overview to see how the Automation is set.
Clicking the Stop icon will stop the Automation.
Stages using Lead Sources will prompt the option to create automated Lead Call Backs
For example:
Stage 1 of your nurture Campaign: Connect Email
Follow Up Stage: automatically create a Call Back for all new Recipients to the Source.
! Note – If there is already a Call Back created against a lead and the date is in the past:
The Call Back date will be overwritten and a new note will be added to the Lead with a link to the Campaign
! Note – If there is a Call Back already created against a lead for a date in the future:
A new note will be added to the lead but the date will not change.
For more information on Lead Management, click here.
With Touch Point Automation, you can automate Alerting based on Touch Points.
Next, use this information to automatically create follow up Activities.
Additionally use Touch Point Automation to create Touch Points from Alerts.
Touch Point Alerts can be set up for Accounts, Contacts and Leads.
Touch Point Automation is fully configured in the Administration console.
Please contact your Gold-Vision Administrator for more information.
Here are a few ideas on how to use Touchpoint Automation:
Automatically assign qualified Leads to Account Managers
As part of your Touch Point Scoring strategy, decide when a Lead is fully qualified for your business, e.g. upon reaching a Score of 200.
You can then automatically assign all Leads reaching a Score of 200 to one or more members of your team.
Create automated follow up Activities from Touch Point actions
Using Touch Point Alerting, automatically create a ‘Showed interest in new product’ Contact Activity
when a Contact has read a particular blog and visited a new product page on your website.
For Leads, you can automatically create a Call Back.
Automatically alert Account Managers to their customer’s social activity
Send an automatic Alert to Account Managers when their Contacts tweet about your brand.
Add Touch Point Scores to Alerts
Give a Touch Point Score when a new Opportunity of over £50,000 is created, or when a new Event Booking is created.
Automatically add Leads to a Campaign Source at the optimum moment
When Leads reach a Touch Point Score of 50 for example, add them to your nurture Campaign Source.
This ensures you are delivering relevant messages to specific targets at the right time.