

Viewing and Creating UsersCreate and Edit Users in |
Teams and MembershipSet up and manage teams in Gold-Vision. |
User Access OptionsManage which team has access to which items in Gold-Vision. |
In this area you can set up users and control their access to areas of Gold-Vision. It is also key to establishing security rules, and therefore it is one of the first implementation steps.

To view a list of all Gold-Vision users, select Users > View Users from the main menu.
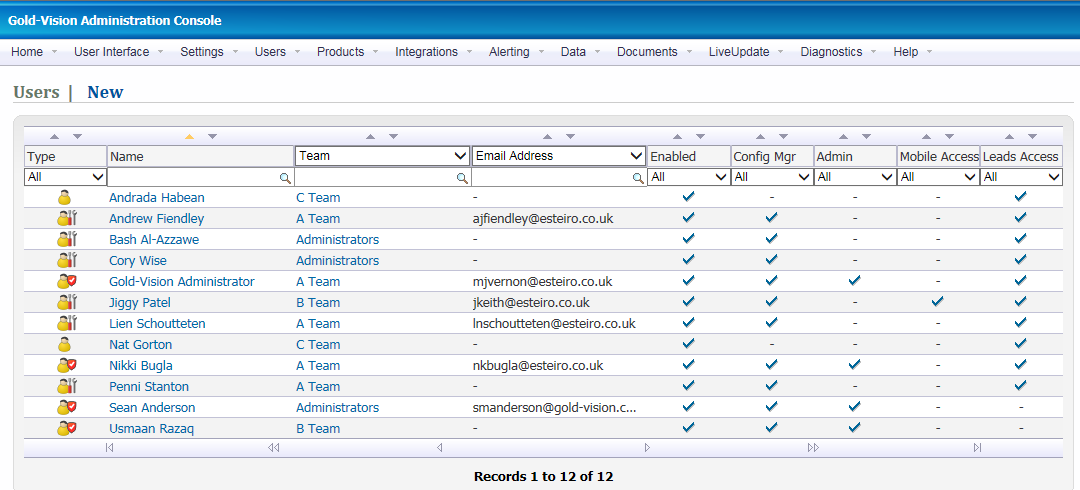
To edit a user click on their name, this will open a new window with the user edit screen.
To edit an existing user, click on their name from the list. The user edit screen will open in a new window. Make any changes necessary and then click Save. A detailed description of the user screen fields is included below.
The Preferences button allows an administrator to edit a user's homepage options.
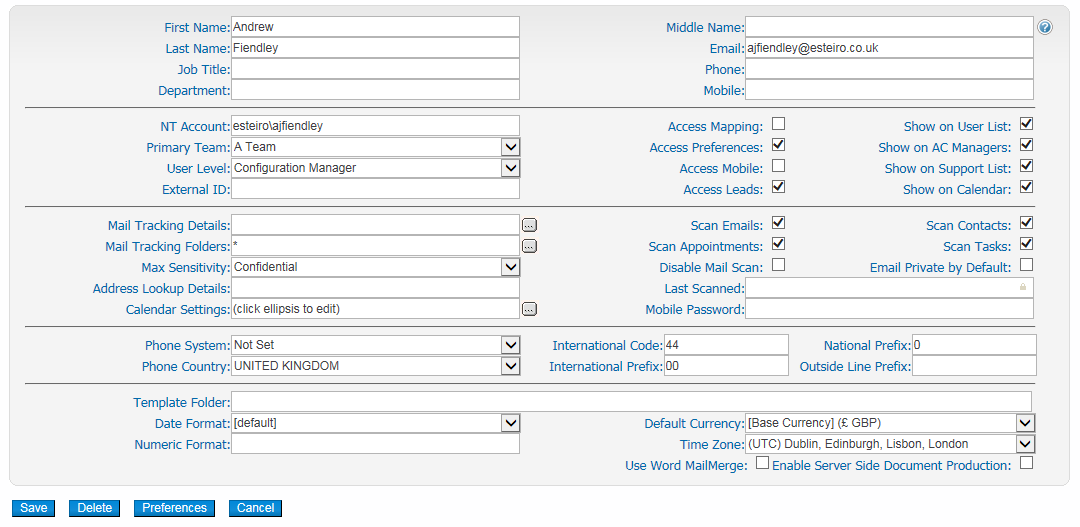
The user screen is the same for new or editing. The table below explains each of the fields. To save changes, click the Save .
| Field(s) | Details | Mandatory |
| First, Middle & Last Names | The user's names. The middle name is optional. | Yes |
| User's primary email address. | No | |
| Job Title | User's job title, role or position. | No |
| Department | User's business department. | No |
| Phone, Mobile | User's contact telephone numbers(s). These details are useful to set up because they may be used by template documents. | No |
| NT Account | User's Windows logon identity in the format 'Domain\Username'. | Yes |
| Primary Team | Select the primary team this user belongs to. If this user is a Mail-Tracker then do not select a team. | Yes |
User Level |
Options are: Disabled - No access to Gold-Vision, but this may be useful for including colleagues who are not users but you may wish to shows as owners of items. Basic User - A normal user with access to Gold-Vision, but without access to the Administration Console. Visibility of items is controlled by the User Access Options screen, see section below. Configuration Manager - This provides access to the configuration options in the Admin Console, but still limits your view of data to your own team access rights. System Administrator - Full administration rights - can see all data, irrespective of any security that may be active on it, and change the rights for all users. |
Yes |
| External ID | This field is used for holding references when integrating with other solutions. | No |
| Access Mapping | Checkbox to allow a user to use Google Mapping | No |
Access Preferences |
Checkbox to allow a user to change their Homepage Preferences. | No |
| Access Mobile | Checkbox to allow a user to use the Mobile interface, if licences available. |
No |
| Access Leads | Checkbox to allow a user to access Lead Management | No |
| Show on User List | Checkbox to allow the contact to be included on the user list for ownership of activities, opportunities, projects etc |
No |
| Show on AC Managers | Checkbox to allow the contact to be included on the user list for ownership of Accounts. | No |
| Show on Support List | Checkbox to allow the contact to be included on the user list for Support Manager. |
No |
| Show on Calendar | Checkbox to allow a user to be selected on the Calendar view | No |
| Mail Tracking Details | Mailbox connection string created automatically by entering the Connection type (CDO, Exchange 2007 Web services, IMAP 4 etc), Server details and Username. | Yes |
| Mail Tracking Folders |
"*" to scan all folders and sub folders for this user, or enter specific folders that you want scanned. This is particularly useful for users that receive large volumes of customer data, much of which has no value in a CRM system. | No |
| Max Sensitivity |
Gold-Vision mail tracking will obey Outlook mail sensitivity options - select the level that Gold-Vision shouldn't track (Normal, Personal, Private, Confidential). | No |
| Address Lookup Details |
Information on postcode lookup for this user. The exact format of the required information will depend on the postcode lookup software - consult Gold-Vision support for details. |
No |
| Calendar Settings | Checkbox to allow a user to be selected in the Calendar view | No |
| Scan E-mails | If mail scanning is enabled for this user, scan e-mails, subject to confidentiality rules. | No |
| Scan Appointments | If mail scanning is enabled for this user, scan appointments. | No |
| Disable Mail Scan | Disable all mail scanning for this user. Manual adding of items is still allowed. | No |
| Scan Contacts | If mail scanning is enabled for this user, scan contacts. | No |
| Scan Tasks | If mail scanning is enabled for this user, scan tasks. | No |
| Last Scanned | Last date the user's mailbox was scanned (read-only). | n/a |
| Email Private by Default | For users that want e-mail scanning and attaching to relevant Accounts and Contacts, but where there is a high proportion of business sensitive correspondence. Emails will only be visible to that user (plus full Administrators) but they may "publish" the e-mail by changing it's status to public. |
No |
| Mobile Password | Gold-Vision mobile may be accessed using Windows authentication, or using basic authentication. In the later case, a password needs to be created. Leave blank unless notified by support. | No |
| Phone System & Detail fields | If there is an integrated soft-phone system, select it from the list. The other fields allow you to configure international user defaults, outside line prefixes and other options. |
No |
| Template folder | Optional template folder, leave blank for default (recommended). | No |
International Defaults |
Choose relevant international options for this user - Date format, numeric format, Default currency (used for displaying local Opportunity values) and time difference (used for adjusting Alerts to user local time). |
No |
| User Word MailMerge | Use Word MailMerge functionality for running letter campaigns - only select if notified by Support. | No |
| Enable Server Side Document Production | Switches document production from client side using Active-x controls (ie run on the user's machine) to server side (ie completed on the Gold-Vision Server) | No |
From the main users list, click the New icon in the top right hand corner.. The new User screen will open in a new window. Enter the User details, select a Primary Team and click Save.
Please note: If you require a user to be set up with access to Gold-Vision Connect please contact our support team
Before fully deleting a user, we recommend initially setting them to be disabled. In the user record, change their user level to "Disabled". This will stop them accessing Gold-Vision but allows any items owned to be transferred to other users. Disabling a user does not remove ownership of items. Any users who currently have access to those Accounts will still have access. A disabled user does not count towards the user licence count.
Once any changes of ownership have been completed the user can be fully deleted from the user configuration screen by clicking the delete button. This will remove ownership of any accounts, but leave that user as owner of other items and their records of notes, etc will remain intact. They will no longer be able to be selected as owner of any items.
To move a User, open the user by clicking on their name then choose a new Primary Team from the drop down selection, then save the user record. This can also be achieved in the Team Memberships screen.
To view a list of all Gold-Vision teams, select Users then View Teams from the main menu. To edit a team click on its name, this will open a new window with the team edit screen. To add a new team, select New then Team from the main menu.
Important Note: Gold-Vision team membership has two levels. "Primary-membership" represents a user's main team. However, users can be added to multiple teams under what is known as "Secondary Membership". Users can be a member of many teams. The important impact of adding a user to a team (via Primary or Secondary membership) is that they will be able to "see" that team's accounts and sub-items under their "team" lists.
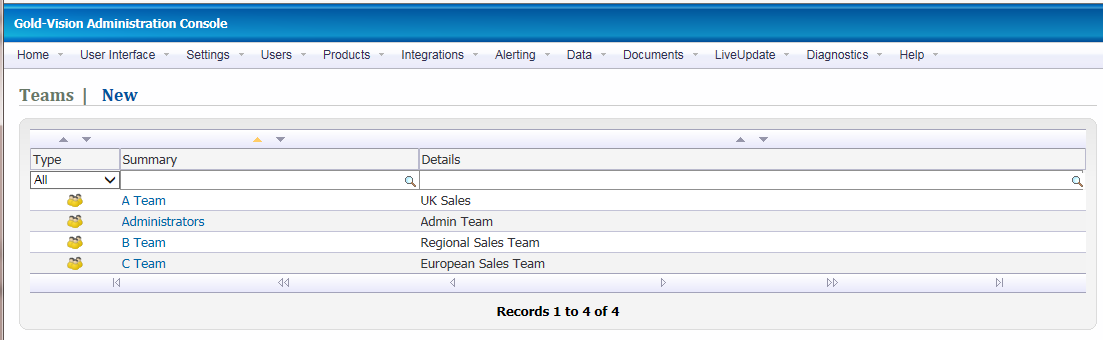
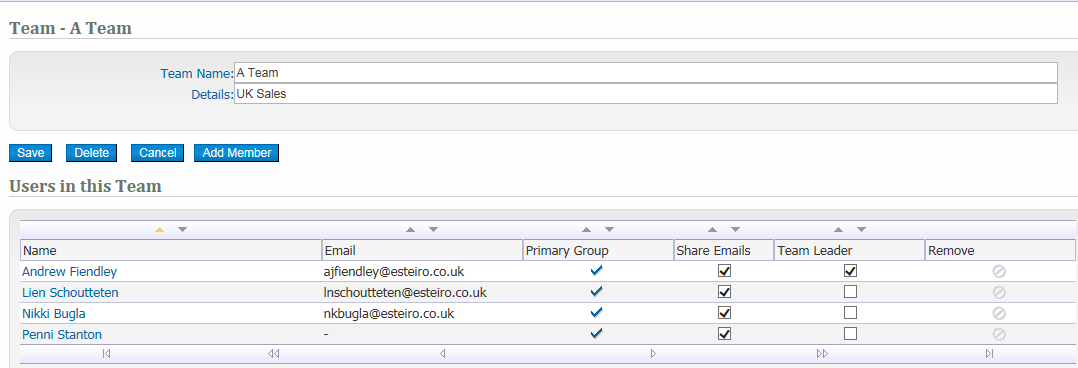
Selecting a team enables you to edit the following:
1. Summary - this is the name of the team as it will appear in Gold-Vision.
2.Details - optional notes about this team.
3. Opt to share emails within the Team
4. Select a Team Leader*
5. To add an existing user to the team via "Secondary Membership" click the Add button and select the user from the list that appears.
To move a user between teams via "Primary Membership", edit the user from the main View Users list, change their Primary Team and click Save
* Team Leaders - this relates to Lead Management. Team leaders can reassign leads allocated to the Team. There can be more than one team leader per team.
A more visual view of user team memberships can be obtained by selecting Users then Team Memberships from the menu:
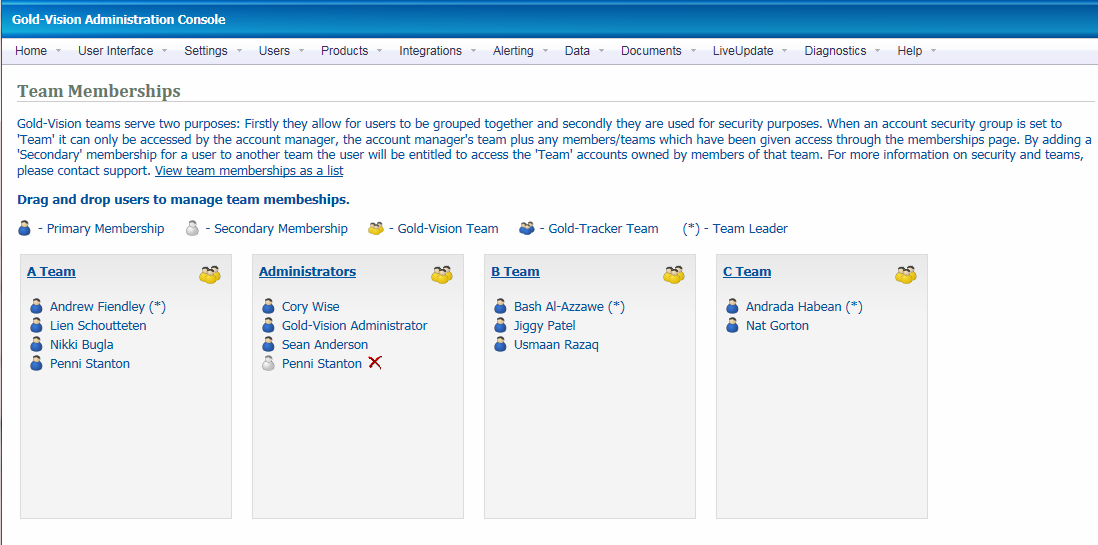
Editing / Managing a Team
To edit or manage a team, click on the team name. This appears at the top of each box.
Editing a User
To edit a user, or move their “primary membership” to another team, click on their name.
Adding a Secondary Membership
To add a user to a team using “secondary membership”, click the (add) option that appears next to the team name.
Removing a Secondary Membership
To remove or delete a secondary membership, click the delete cross next to the user in the team.
Team Leaders - this relates to Lead Management. Team leaders can reassign leads allocated to the Team. There can be more than one team leader per team.
!Important Note: The important impact of adding a user to a team (via Primary or Secondary membership) is that they will be able to “see” that team’s accounts and sub-items under their “team” lists. For more information on security and teams, please see Appendix A.
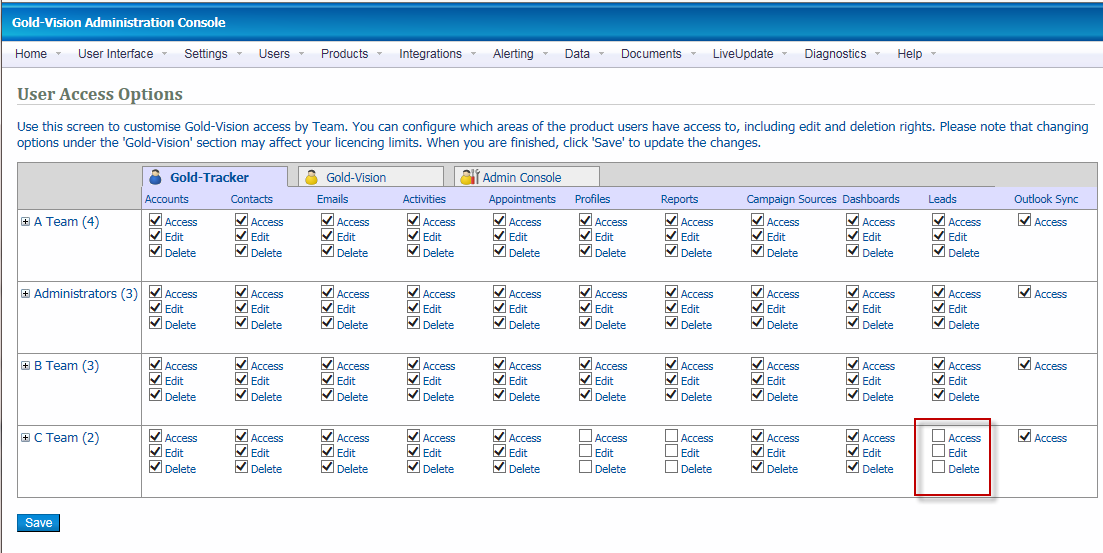
Access to Gold-Vision item types (Opportunities, Projects, Reports etc) can be restricted by Primary team using the Team Access Options Screen. To open this screen select Users then Team Access Options from the menu.
It may be that certain users or teams do not require access or edit abilities to item types which are irrelevant to them or access/editability to these types may be restricted for security or business reasons.
The access options screen lists your GV teams down the left hand edge. Next to each team, horizontally, is a list of Gold-Vision item options. To set the access/edit/delete options modify the relevant checkbox and click Update. When a user’s team does not have access to a particular item type, all icons and menus to that item type will “disappear” from the Gold-Vision user interface.
If a Team has Access to an item, they will be able to View the information, but not edit or delete the item.
The Edit option grants the team the ability to view the item and change it, but not to delete. Delete gives the team full control over the items.
The item types are grouped into two main areas: Gold-Tracker functions, Gold-Vision functions.
Using the checkbox you can modify access, edit and delete abilities across Gold-Vision items.